
Oracle ASM Database Installation Step-by-Step Guide
Introduction
Introduction Oracle Automatic Storage Management (ASM) speeds up, simplifies, and makes database storage more reliable by managing files, striping, and mirroring automatically. In this beginner-friendly guide, we’ll walk you through installing Oracle Database 19c with ASM step-by-step. This includes preparing your environment and creating your first ASM disk group.
Today I’ll guide you through installing ASM (Automatic Storage Management) step by step. Below are the details of my Linux test environment and the initial commands I ran to set up a software directory.
Linux environment (disk usage):
[root@dbadiscovery ~]# df -PH
Filesystem           Size  Used Avail Use% Mounted on
devtmpfs             885M     0  885M   0% /dev
tmpfs                905M     0  905M   0% /dev/shm
tmpfs                905M   10M  895M   2% /run
tmpfs                905M     0  905M   0% /sys/fs/cgroup
/dev/mapper/ol-root  159G   12G  147G   8% /
/dev/mapper/ol-tmp    17G   34M   17G   1% /tmp
/dev/mapper/ol-var   5.4G  1.5G  4.0G  27% /var
/dev/mapper/ol-home  5.4G   39M  5.4G   1% /home
/dev/sda2            5.4G  242M  5.2G   5% /boot
tmpfs                181M  8.2k  181M   1% /run/user/42
tmpfs                181M   21k  181M   1% /run/user/0
/dev/sr0              59M   59M     0 100% /run/media/root/VBox_GAs_7.1.0
Before starting the ASM installation, you need to download the required Oracle binaries and copy them to your target server. Download the files Go to the Oracle Software Delivery Cloud. Search for Oracle Database 19c and download: Oracle Grid Infrastructure 19c (for ASM); file name: V982063-01.zip Oracle Database 19c (RDBMS); file name: V982068-01.zip Copy to the target server Use any secure transfer method like scp, rsync, or WinSCP. For Copy
scp V982063-01.zip V982068-01.zip root@target_server_ip:/u01/software/

[root@dbadiscovery u01]# cd /u01/software/
[root@dbadiscovery software]# ll
total 5809468
-rwxr-----. 1 root root 3059705302 Aug 28  2023 V982063-01.zip
-rwxr-----. 1 root root 2889184573 Aug 28  2023 V982068-01.zip
[root@dbadiscovery software]#
We need to prepare the operating system by installing the Oracle Database Preinstallation RPM. This package automatically creates the necessary OS users and groups, sets kernel parameters, and installs important dependencies.
Note: This package does not create the Grid Infrastructure-specific user and groups. – grid (user) – asmadmin (group) – asmdba (group) – asmoper (group) We will create these manually in the next step before installing ASM.
root@dbadiscovery software]# yum -y install oracle-database-preinstall-19c.x86_64
Loaded plugins: langpacks, ulninfo
ol7_UEKR5                                                       | 3.0 kB  00:00:00
ol7_latest                                                      | 3.6 kB  00:00:00
Resolving Dependencies
--> Running transaction check
---> Package oracle-database-preinstall-19c.x86_64 0:1.0-3.el7 will be installed
--> Processing Dependency: ksh for package: oracle-database-preinstall-19c-1.0-3.el7.x86_64
--> Processing Dependency: libaio-devel for package: oracle-database-preinstall-19c-1.0-3.el7.x86_64
--> Running transaction check
---> Package ksh.x86_64 0:20120801-144.0.1.el7_9 will be installed
---> Package libaio-devel.x86_64 0:0.3.109-13.el7 will be installed
--> Finished Dependency Resolution

Dependencies Resolved

=======================================================================================
 Package                          Arch     Version                  Repository    Size
=======================================================================================
Installing:
 oracle-database-preinstall-19c   x86_64   1.0-3.el7                ol7_latest    27 k
Installing for dependencies:
 ksh                              x86_64   20120801-144.0.1.el7_9   ol7_latest   882 k
 libaio-devel                     x86_64   0.3.109-13.el7           ol7_latest    12 k

Transaction Summary
=======================================================================================
Install  1 Package (+2 Dependent packages)

Total download size: 921 k
Installed size: 3.2 M
Downloading packages:
warning: /var/cache/yum/x86_64/7Server/ol7_latest/packages/libaio-devel-0.3.109-13.el7.x86_64.rpm: Header V3 RSA/SHA256 Signature, key ID ec551f03: NOKEY
Public key for libaio-devel-0.3.109-13.el7.x86_64.rpm is not installed
(1/3): libaio-devel-0.3.109-13.el7.x86_64.rpm                   |  12 kB  00:00:01
(2/3): oracle-database-preinstall-19c-1.0-3.el7.x86_64.rpm      |  27 kB  00:00:00
(3/3): ksh-20120801-144.0.1.el7_9.x86_64.rpm                    | 882 kB  00:00:01
---------------------------------------------------------------------------------------
Total                                                     537 kB/s | 921 kB  00:01
Retrieving key from file:///etc/pki/rpm-gpg/RPM-GPG-KEY-oracle
Importing GPG key 0xEC551F03:
 Userid     : "Oracle OSS group (Open Source Software group) <[email protected]>"
 Fingerprint: 4214 4123 fecf c55b 9086 313d 72f9 7b74 ec55 1f03
 Package    : 7:oraclelinux-release-7.7-1.0.5.el7.x86_64 (@anaconda/7.7)
 From       : /etc/pki/rpm-gpg/RPM-GPG-KEY-oracle
Running transaction check
Running transaction test
Transaction test succeeded
Running transaction
  Installing : libaio-devel-0.3.109-13.el7.x86_64                                  1/3
  Installing : ksh-20120801-144.0.1.el7_9.x86_64                                   2/3
  Installing : oracle-database-preinstall-19c-1.0-3.el7.x86_64                     3/3
  Verifying  : ksh-20120801-144.0.1.el7_9.x86_64                                   1/3
  Verifying  : libaio-devel-0.3.109-13.el7.x86_64                                  2/3
  Verifying  : oracle-database-preinstall-19c-1.0-3.el7.x86_64                     3/3

Installed:
  oracle-database-preinstall-19c.x86_64 0:1.0-3.el7

Dependency Installed:
  ksh.x86_64 0:20120801-144.0.1.el7_9       libaio-devel.x86_64 0:0.3.109-13.el7

Complete!
Install ASM Support Packages
yum -y install oracleasm*
yum -y install kmod-oracleasm*
Create Users and Groups
[root@dbadiscovery software]# groupadd -g 43210 asmdba
[root@dbadiscovery software]# groupadd -g 43211 asmoper
[root@dbadiscovery software]# groupadd -g 43212 asmadmin

[root@dbadiscovery software]# useradd -u 43213 -g oinstall -G dba,asmdba,asmoper,asmadmin,racdba grid

[root@dbadiscovery software]# id oracle
uid=54321(oracle) gid=54321(oinstall) groups=54321(oinstall),54322(dba),54323(oper),54324(backupdba),54325(dgdba),54326(kmdba),54330(racdba)
[root@dbadiscovery software]# usermod -a -G asmdba oracle
[root@dbadiscovery software]# id oracle
uid=54321(oracle) gid=54321(oinstall) groups=54321(oinstall),54322(dba),54323(oper),54324(backupdba),54325(dgdba),54326(kmdba),54330(racdba),43210(asmdba)
[root@dbadiscovery software]#


[root@dbadiscovery software]# id grid
uid=43213(grid) gid=54321(oinstall) groups=54321(oinstall),54322(dba),54330(racdba),43210(asmdba),43211(asmoper),43212(asmadmin)
Make sure that both the oracle and grid user passwords are set correctly. You can do this with the passwd command as shown below:
[root@dbadiscovery software]# passwd oracle
Changing password for user oracle.
New password:
BAD PASSWORD: The password is shorter than 8 characters
Retype new password:
passwd: all authentication tokens updated successfully.
[root@dbadiscovery software]# passwd grid
Changing password for user grid.
New password:
BAD PASSWORD: The password is shorter than 8 characters
Retype new password:
passwd: all authentication tokens updated successfully.
Disable the firewall to avoid network communication issues. To stop and disable the firewall service, run the following commands:
[root@dbadiscovery ~]# systemctl status firewalld
   firewalld.service - firewalld - dynamic firewall daemon
   Loaded: loaded (/usr/lib/systemd/system/firewalld.service; enabled; vendor preset: enabled)
   Active: active (running) since Sun 2025-07-13 02:18:28 IST; 18min ago
     Docs: man:firewalld(1)
 Main PID: 971 (firewalld)
    Tasks: 2
   CGroup: /system.slice/firewalld.service
           └─971 /usr/bin/python2 -Es /usr/sbin/firewalld --nofork --nopid

Jul 13 02:18:27 dbadiscovery.com systemd[1]: Starting firewalld - dynamic firewall.....
Jul 13 02:18:28 dbadiscovery.com systemd[1]: Started firewalld - dynamic firewall ...n.
Hint: Some lines were ellipsized, use -l to show in full.

[root@dbadiscovery ~]# systemctl stop firewalld

[root@dbadiscovery ~]# systemctl disable firewalld
Removed symlink /etc/systemd/system/multi-user.target.wants/firewalld.service.
Removed symlink /etc/systemd/system/dbus-org.fedoraproject.FirewallD1.service.
[root@dbadiscovery ~]# systemctl status firewalld
● firewalld.service - firewalld - dynamic firewall daemon
   Loaded: loaded (/usr/lib/systemd/system/firewalld.service; disabled; vendor preset: enabled)
   Active: inactive (dead)
     Docs: man:firewalld(1)

Jul 13 02:18:27 dbadiscovery.com systemd[1]: Starting firewalld - dynamic firewall.....
Jul 13 02:18:28 dbadiscovery.com systemd[1]: Started firewalld - dynamic firewall ...n.
Jul 13 02:37:29 dbadiscovery.com systemd[1]: Stopping firewalld - dynamic firewall.....
Jul 13 02:37:31 dbadiscovery.com systemd[1]: Stopped firewalld - dynamic firewall ...n.
Hint: Some lines were ellipsized, use -l to show in full.
Disable SELinux
Permanently Disable SELinux (Requires Reboot) To permanently disable SELinux:
Change:
SELINUX=enforcing
To:
SELINUX=disabled
[root@dbadiscovery ~]# getenforce
Enforcing
[root@dbadiscovery ~]# vi /etc/selinux/config
[root@dbadiscovery ~]#
[root@dbadiscovery ~]#
[root@dbadiscovery ~]# cat /etc/selinux/config

# This file controls the state of SELinux on the system.
# SELINUX= can take one of these three values:
#     enforcing - SELinux security policy is enforced.
#     permissive - SELinux prints warnings instead of enforcing.
#     disabled - No SELinux policy is loaded.
SELINUX=disabled
# SELINUXTYPE= can take one of three values:
#     targeted - Targeted processes are protected,
#     minimum - Modification of targeted policy. Only selected processes are protected.
#     mls - Multi Level Security protection.
SELINUXTYPE=targeted


[root@dbadiscovery ~]# getenforce
Enforcing
[root@dbadiscovery ~]#reboot

[root@dbadiscovery ~]# getenforce
Disabled
[root@dbadiscovery ~]#
Configure Oracle ASM & ADD DISK
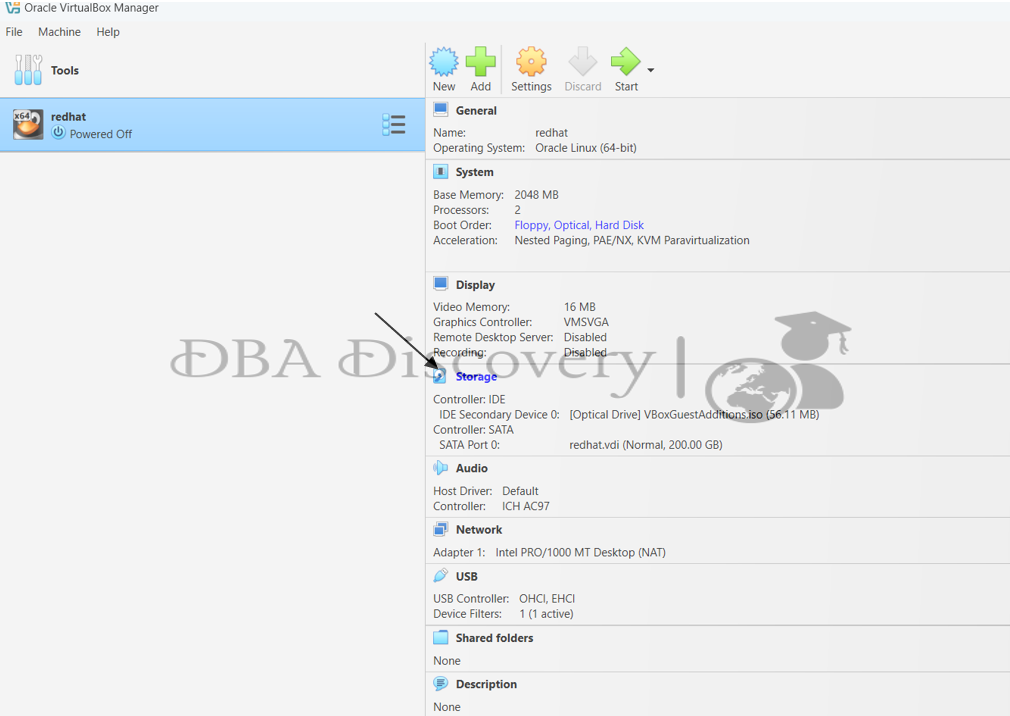
1 step shut down the VM machine
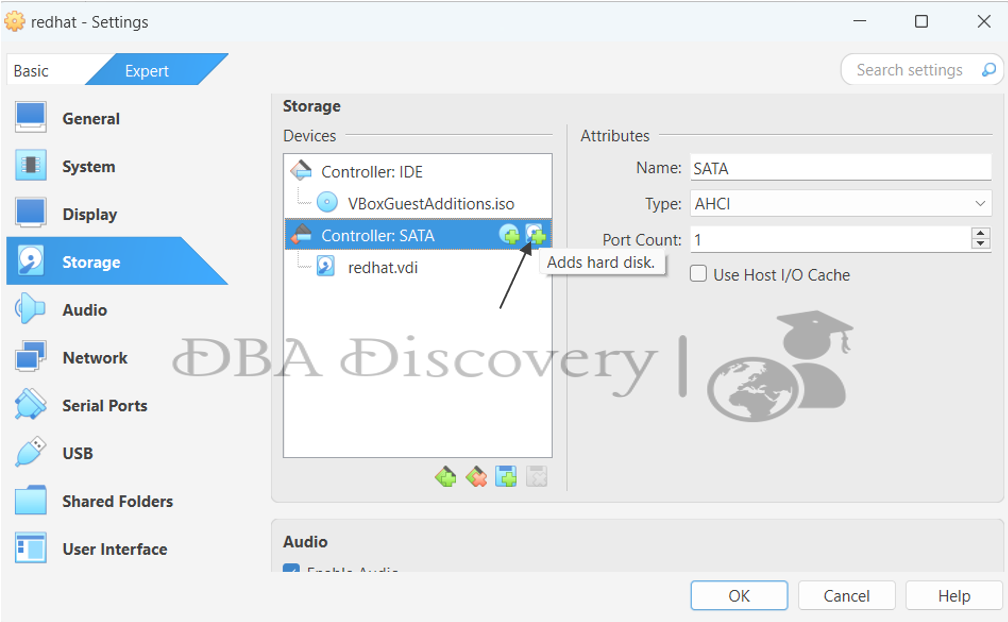
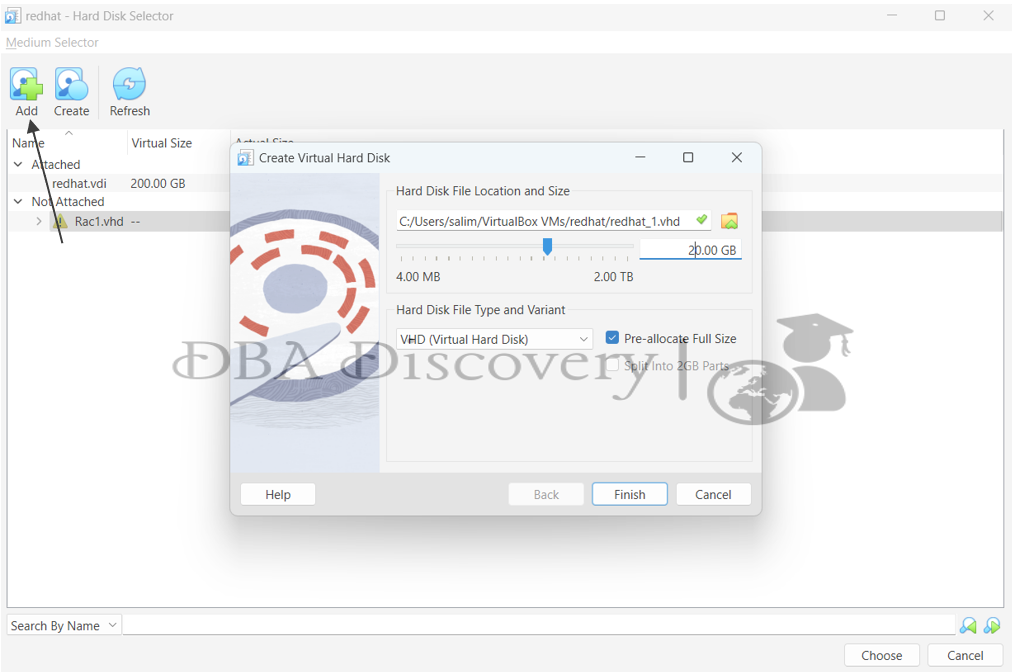
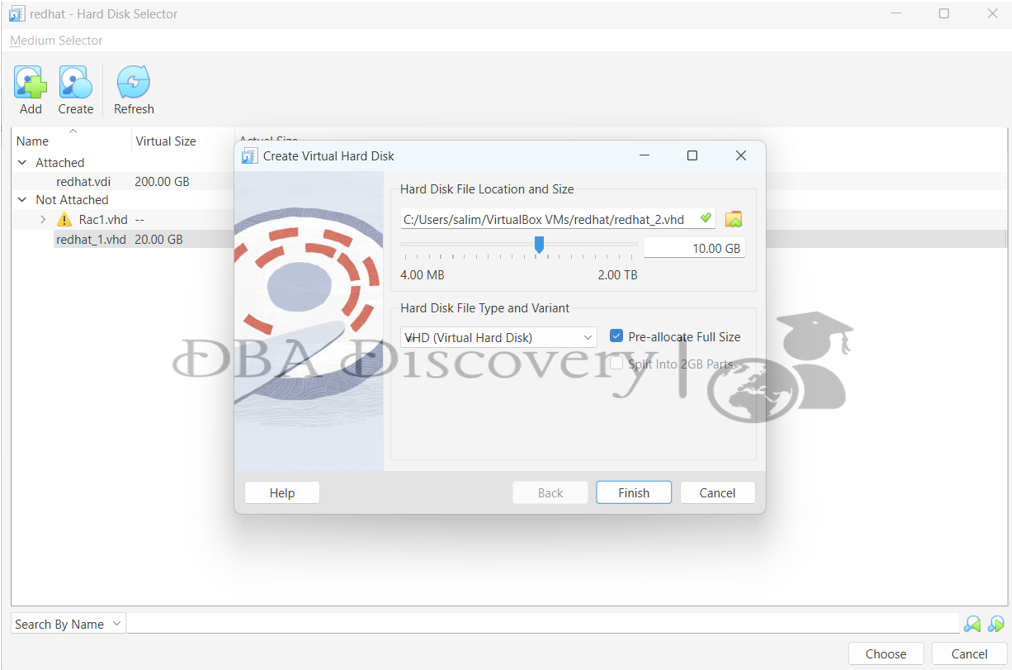
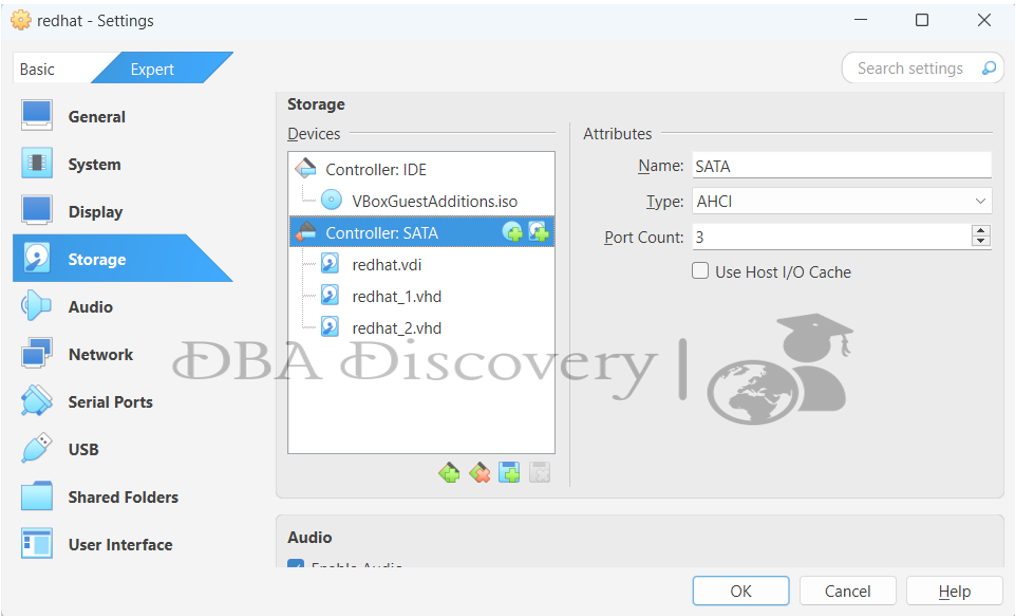
We need more storage for ASM. In VirtualBox, add a new 30 GB hard disk.
Open Virtual Machine, then go to Settings, and click on Storage. Under Controller: SATA, click Add Hard Disk. Choose Create New Disk, set the size to 30 GB, and finish. This new disk, for example, /dev/sdb, will be used for ASM. Create one partition of 20 GB. Create another partition of 10 GB. These two partitions will later be our ASM disks.
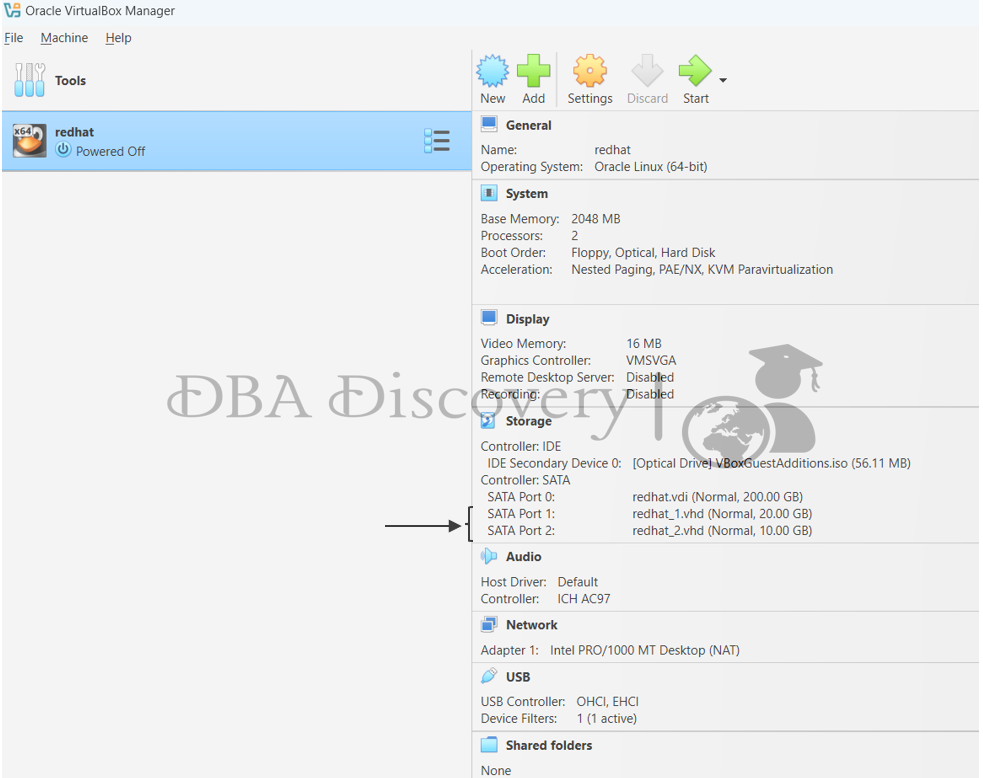
Now you can see two disks have been added in the VM. Start the VM
After you add the new 30 GB disk in VirtualBox and start the VM, check if the operating system detects it by using the command lsblk.
[root@dbadiscovery ~]# lsblk
NAME        MAJ:MIN RM  SIZE RO TYPE MOUNTPOINT
sdb           8:16   0   20G  0 disk
sr0          11:0    1 56.1M  0 rom  /run/media/root/VBox_GAs_7.1.0
sdc           8:32   0   10G  0 disk
sda           8:0    0  200G  0 disk
├─sda2        8:2    0    5G  0 part /boot
├─sda3        8:3    0  193G  0 part
│ ├─ol-swap 252:1    0   20G  0 lvm  [SWAP]
│ ├─ol-var  252:4    0    5G  0 lvm  /var
│ ├─ol-tmp  252:2    0   15G  0 lvm  /tmp
│ ├─ol-root 252:0    0  148G  0 lvm  /
│ └─ol-home 252:3    0    5G  0 lvm  /home
└─sda1        8:1    0    2M  0 part
Now that the system detects the new disks (sdb and sdc), we will create partitions on them to be used by ASM.
[root@dbadiscovery ~]# fdisk /dev/sdb
Welcome to fdisk (util-linux 2.23.2).

Changes will remain in memory only, until you decide to write them.
Be careful before using the write command.

Device does not contain a recognized partition table
Building a new DOS disklabel with disk identifier 0x73185e53.

Command (m for help): n
Partition type:
   p   primary (0 primary, 0 extended, 4 free)
   e   extended
Select (default p): p
Partition number (1-4, default 1): 1
First sector (2048-41943039, default 2048):
Using default value 2048
Last sector, +sectors or +size{K,M,G} (2048-41943039, default 41943039):
Using default value 41943039
Partition 1 of type Linux and of size 20 GiB is set

Command (m for help): w
The partition table has been altered!

Calling ioctl() to re-read partition table.
Syncing disks.
[root@dbadiscovery ~]# fdisk /dev/sdc
Welcome to fdisk (util-linux 2.23.2).

Changes will remain in memory only, until you decide to write them.
Be careful before using the write command.

Device does not contain a recognized partition table
Building a new DOS disklabel with disk identifier 0x39696022.

Command (m for help): n
Partition type:
   p   primary (0 primary, 0 extended, 4 free)
   e   extended
Select (default p): p
Partition number (1-4, default 1): 1
First sector (2048-20971519, default 2048):
Using default value 2048
Last sector, +sectors or +size{K,M,G} (2048-20971519, default 20971519):
Using default value 20971519
Partition 1 of type Linux and of size 10 GiB is set

Command (m for help): w
The partition table has been altered!

Calling ioctl() to re-read partition table.
Syncing disks.
[root@dbadiscovery ~]#
Now create the necessary directories for Grid Infrastructure (ASM) and the Oracle Database
[root@dbadiscovery ~]# mkdir -p /u01/app/oracle/product/19/db_home
[root@dbadiscovery ~]# chown -R oracle:oinstall /u01
[root@dbadiscovery ~]#
[root@dbadiscovery ~]#
[root@dbadiscovery ~]# mkdir -p /u01/app/grid
[root@dbadiscovery ~]# mkdir -p /u01/app/19/grid
[root@dbadiscovery ~]# chown -R grid:oinstall /u01/app/grid
[root@dbadiscovery ~]# ~]# chown -R grid:oinstall /u01/app/19
[root@dbadiscovery ~]# chmod -R 775 /u01
Now that the disks and directories are ready, let’s set up Oracle ASM.
Configure the ASM driver
Run the following as root:
[root@dbadiscovery ~]# oracleasm configure -i
Configuring the Oracle ASM library driver.

This will configure the on-boot properties of the Oracle ASM library
driver.  The following questions will determine whether the driver is
loaded on boot and what permissions it will have.  The current values
will be shown in brackets ('[]').  Hitting <ENTER> without typing an
answer will keep that current value.  Ctrl-C will abort.

Default user to own the driver interface [grid]:
Default group to own the driver interface [asmdmin]: asmadmin
Start Oracle ASM library driver on boot (y/n) [y]: y
Scan for Oracle ASM disks on boot (y/n) [y]: y
Writing Oracle ASM library driver configuration: done
Load / initiate Oracle ASM
oracleasm init
Now, mark the new partitions, sdb1 = 20 GB, sdc1 = 10 GB, as ASM disks.
[root@dbadiscovery ~]# oracleasm createdisk DATA /dev/sdb1
Writing disk header: done
Instantiating disk: done
[root@dbadiscovery ~]# oracleasm createdisk RECO /dev/sdc1
Writing disk header: done
Instantiating disk: done
Verify ASM disks
[root@dbadiscovery ~]# oracleasm listdisks
DATA
RECO
Oracle Grid Infrastructure (ASM) Installation
Go to the software folder and extract the Grid software into the Grid home location.
[grid@dbadiscovery ~]$ cd /u01/software/
[grid@dbadiscovery software]$ unzip V982068-01.zip -d /u01/app/19/grid_home
As the Grid user, navigate to the directory where you unzipped the Oracle Grid Infrastructure software, which should be in the Grid home directory
Run the following command to start the installation process:
./gridSetup.sh
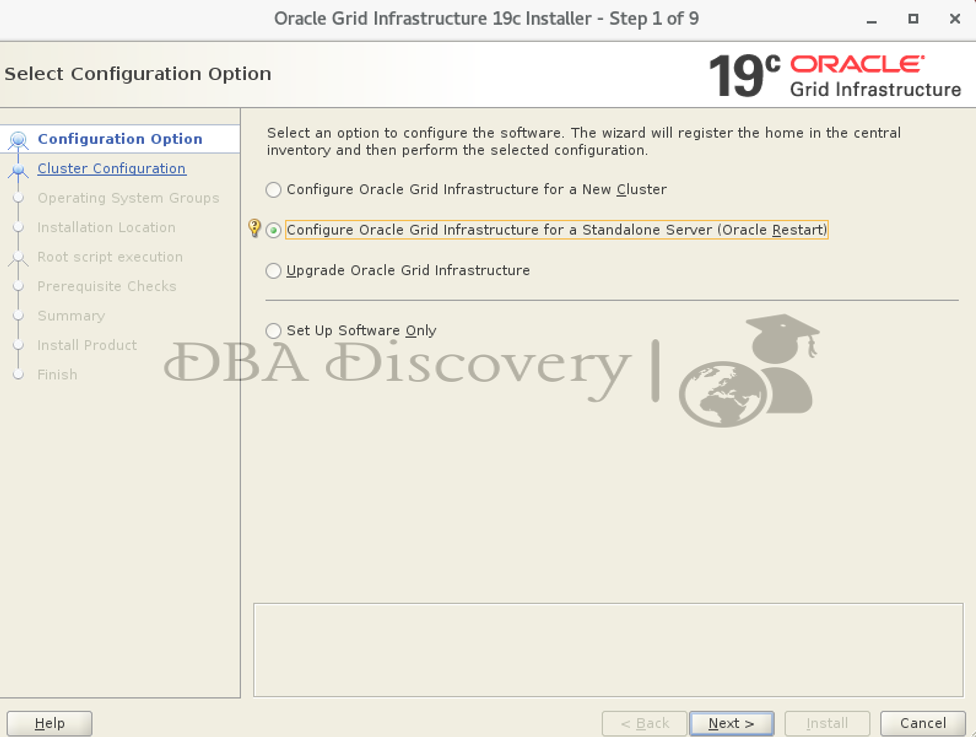
Screen 1: Select Configuration Option
On the first screen, choose Configure Oracle Grid Infrastructure for a standalone server (Oracle Restart) and click Next to continue with the installation.
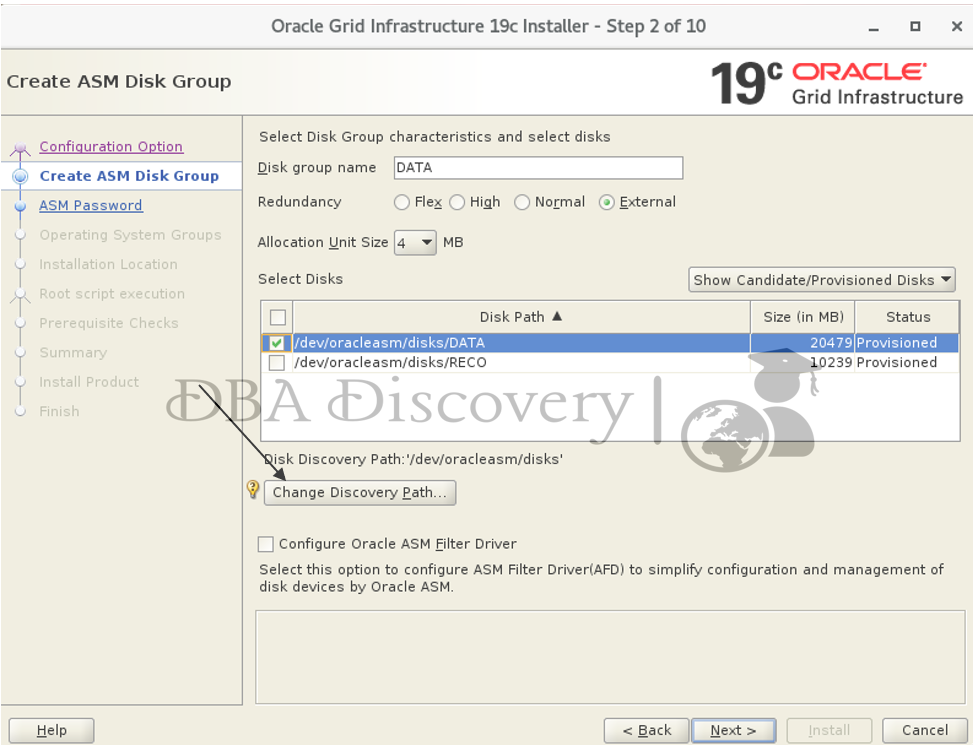
Screen 2: Create ASM Disk Group
Click on Change Discovery Path and set it to /dev/oracleasm/disk
select the available ASM disks.
Set Redundancy to External. This means no mirror copy.
Provide a Disk Group Name. For example, use DATA.
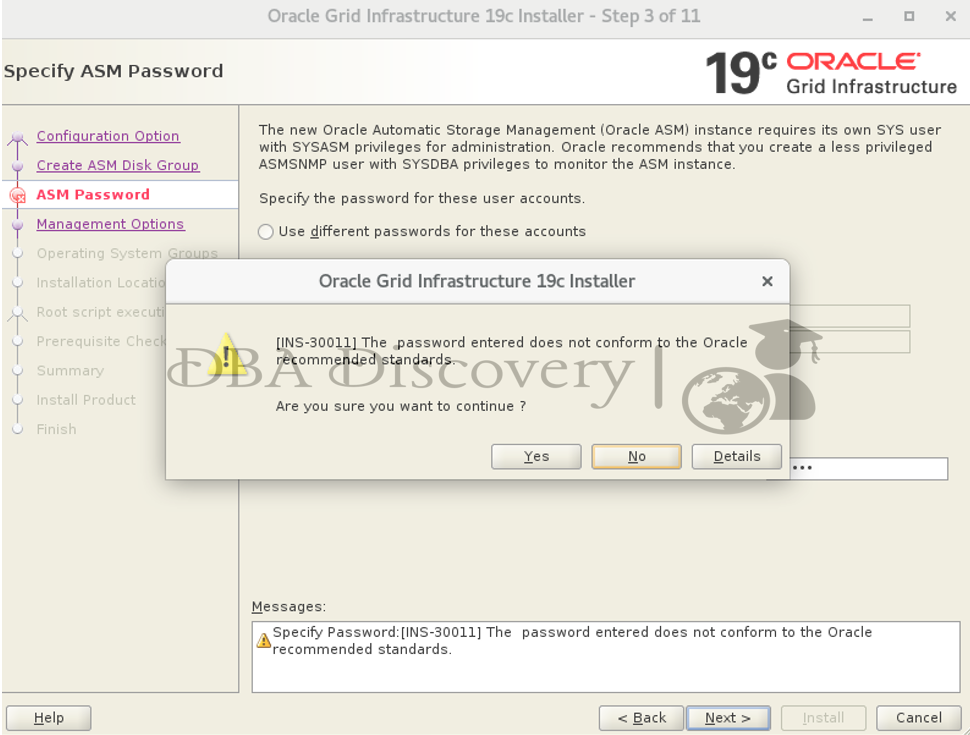
Screen 2: Specify the ASM Password
Select Use Same Password for these Accounts. Enter the password and confirm it. Then click Next and Yes to continue.
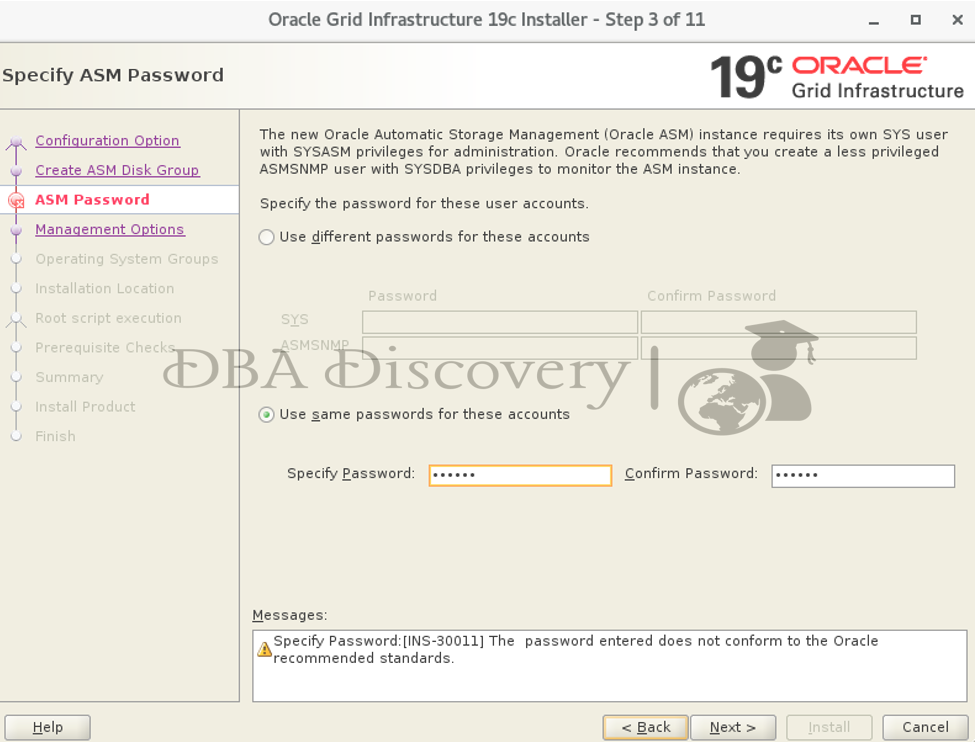
If the password is simple, you might receive error INS-30011. You can either ignore it and click on Y or choose a stronger password according to Oracle guidelines.
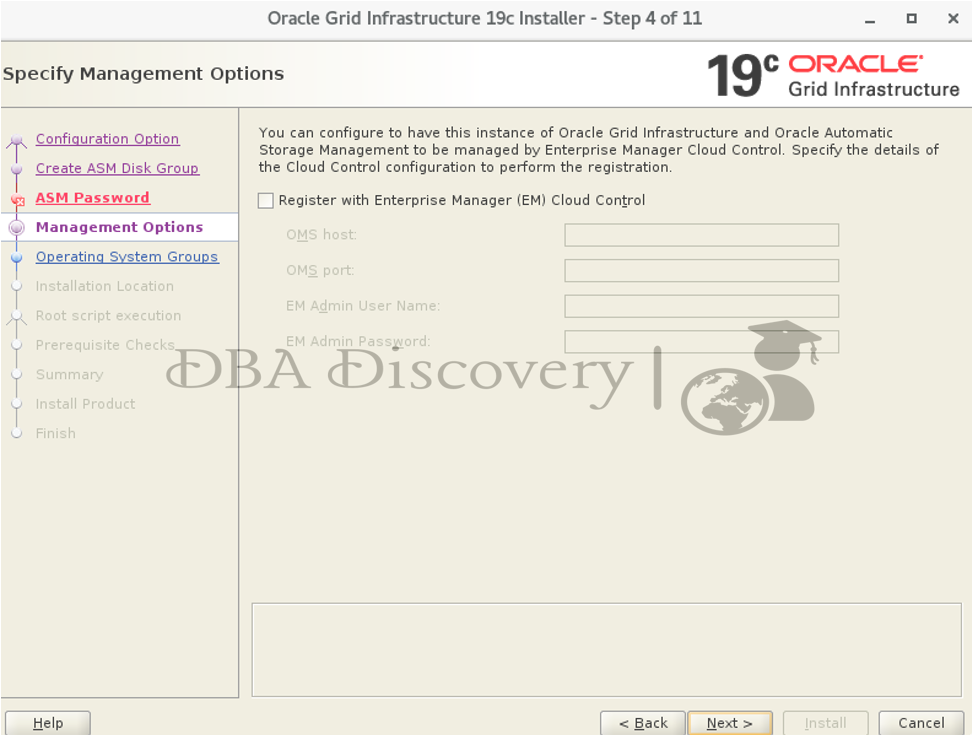
Screen 4: Specify Management Options
click the Next button to proceed
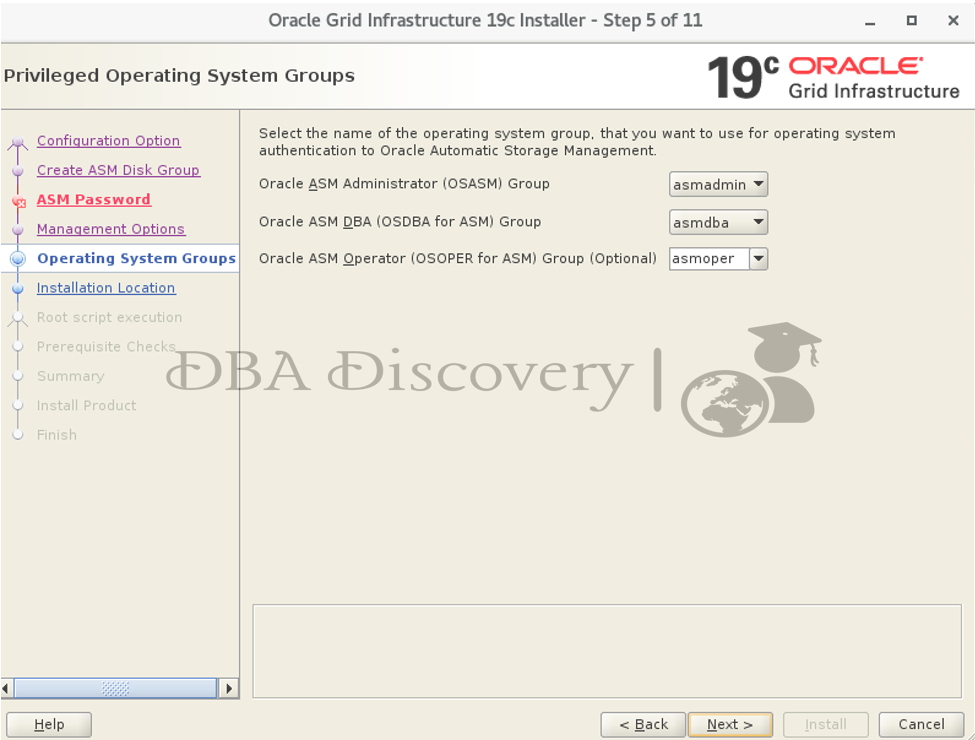
Screen 5: Privileged Operating System Groups
I’ll stick with the default settings for the privileged operating system groups. You can change them based on your environment if needed. Click the Next button to continue.
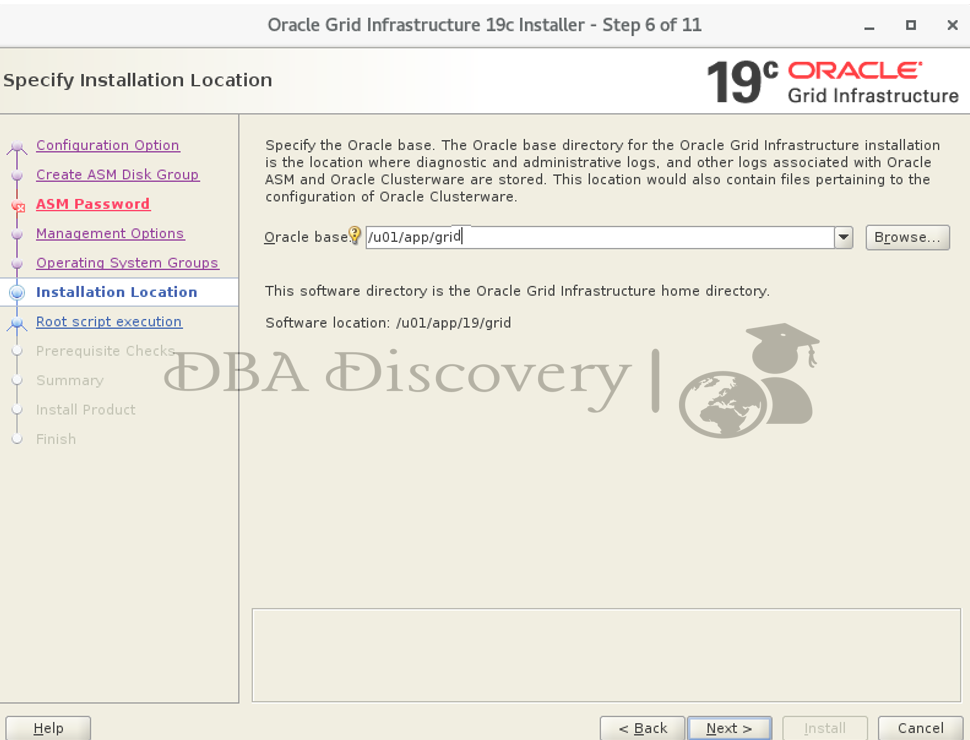
Screen 6: Specify Installation Location
Verify the Oracle home and base location. You can change the Oracle base if it shows an incorrect location. After you make your changes, click the Next button to proceed
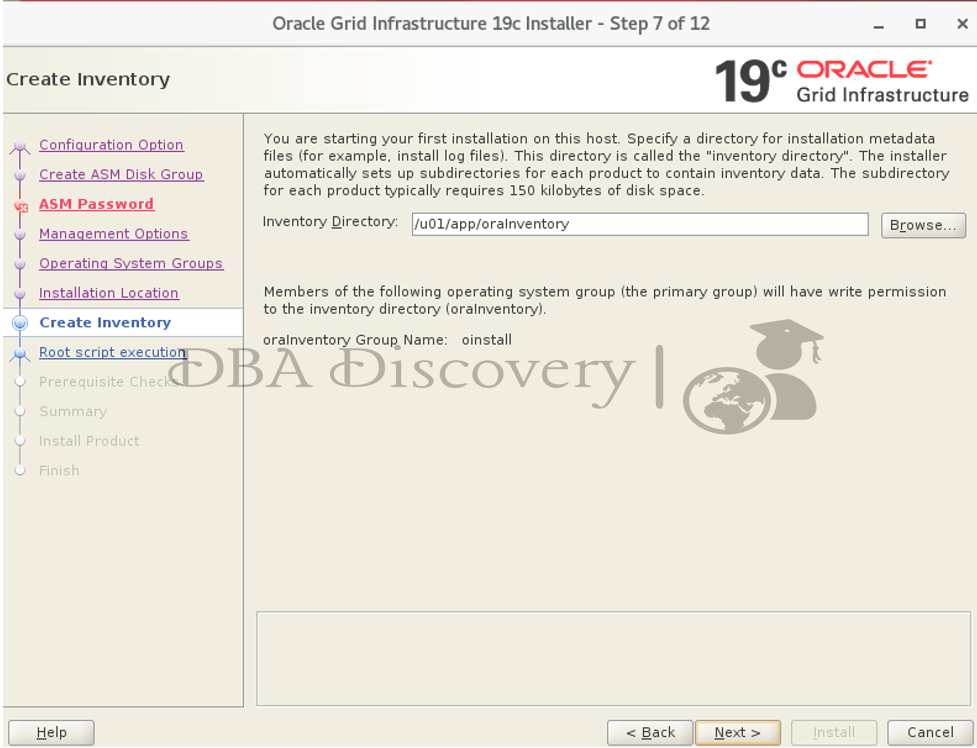
Screen 7: Create Inventory
I’ll use the default path for the inventory location. You can change it based on your setup if needed. Click the Next button to continue
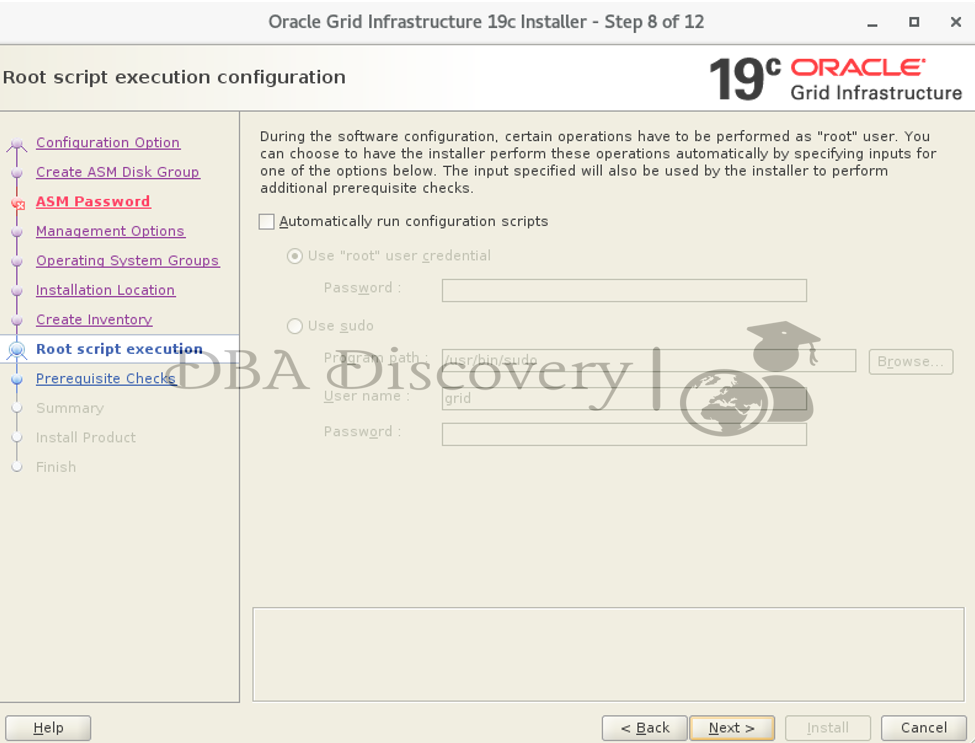
Screen 8: Root Script Execution Configuration
I’ll Uncheck the option to run the root scripts automatically. I will run them manually later. Click the Next button to continue.
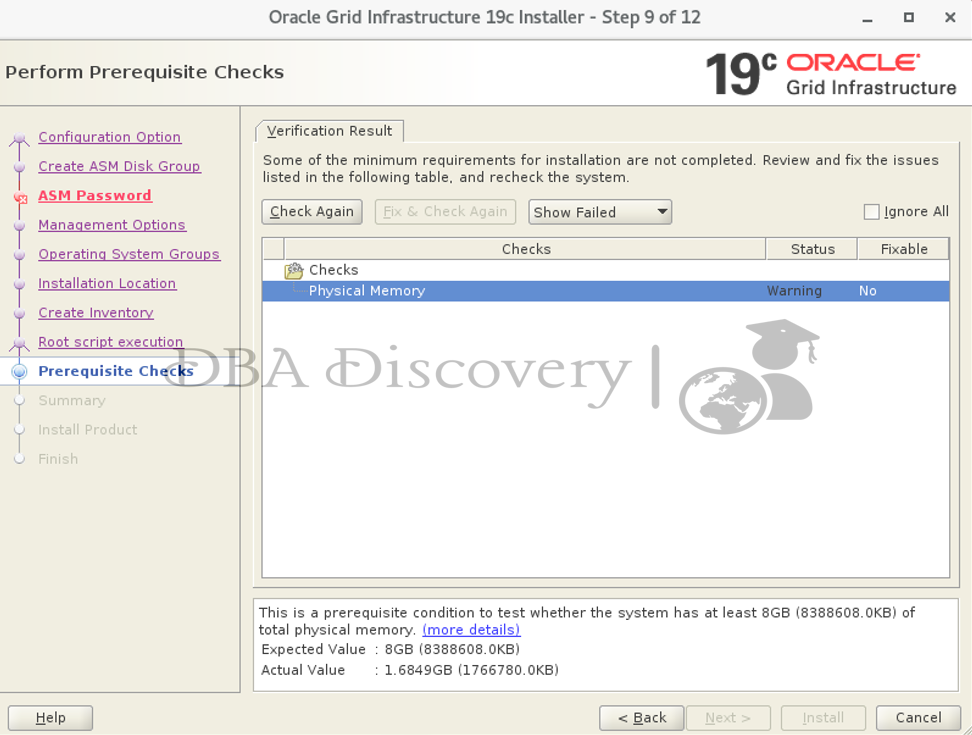
Screen 9: Perform Prerequisite Checks
Review and fix the issues listed in the following table and recheck the system.
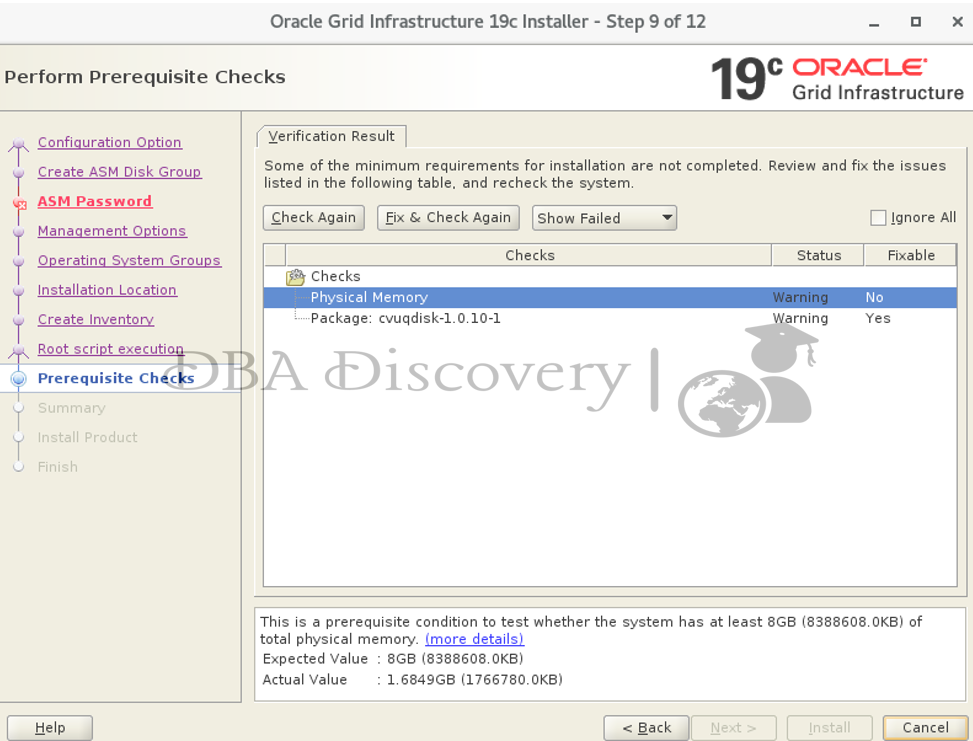
Here, there is 2 checks failed
1. Physical Memory
Failed: Not enough RAM.
Note: This is just a test setup okay to ignore
2. cvuqdisk-1.0.10-1 Package
Failed: RPM not installed.
Solution:
cd /u01/app/19/grid/cv/rpm/
yum install cvuqdisk-1.0.10-1.rpm
After installing, re‑run the pre‑check to confirm everything passes & click Next.
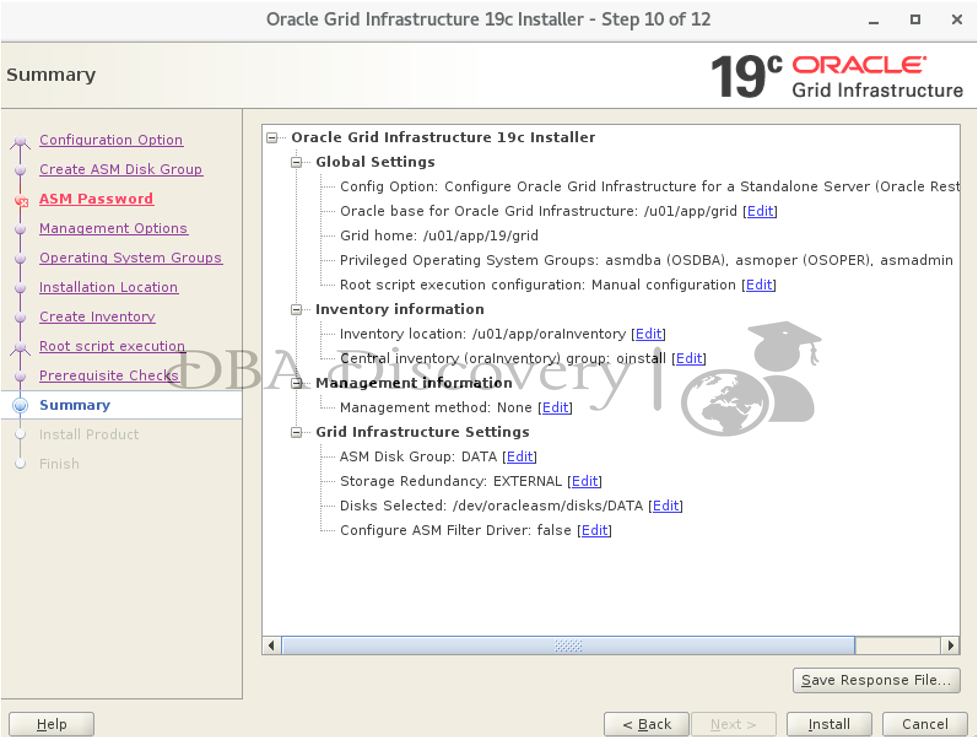
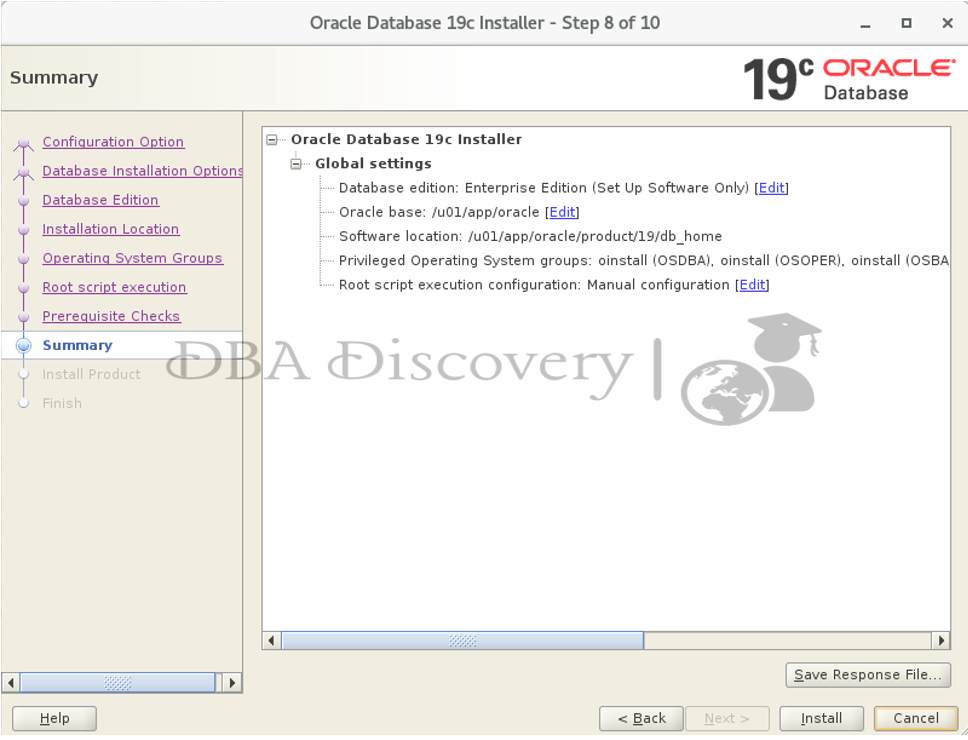
Screen 10: Summary
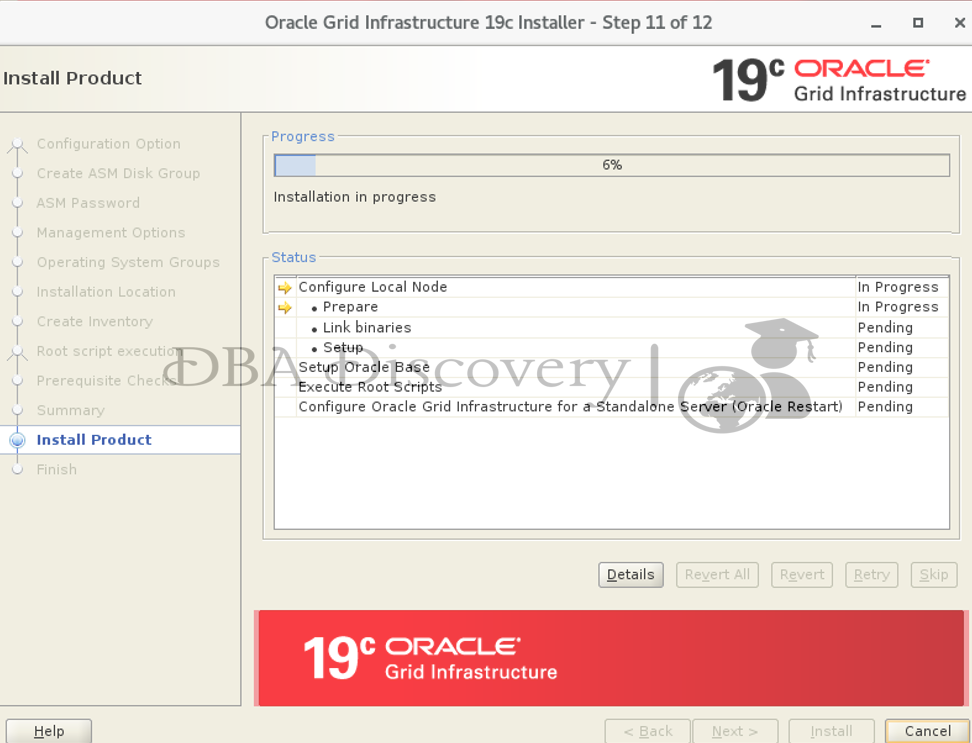
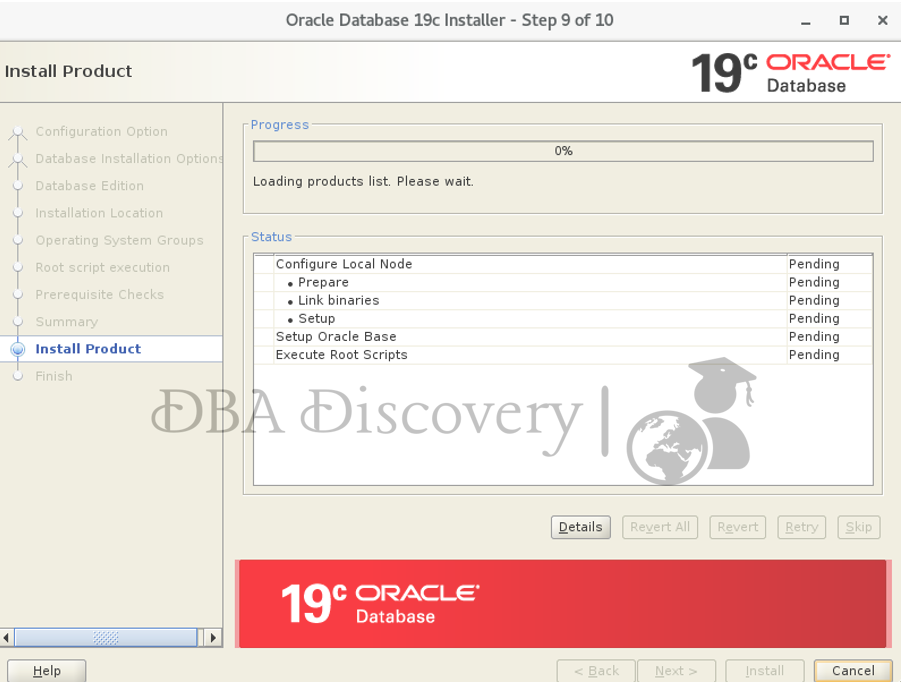
Review the details & click the Install button to proceed with the Installation.
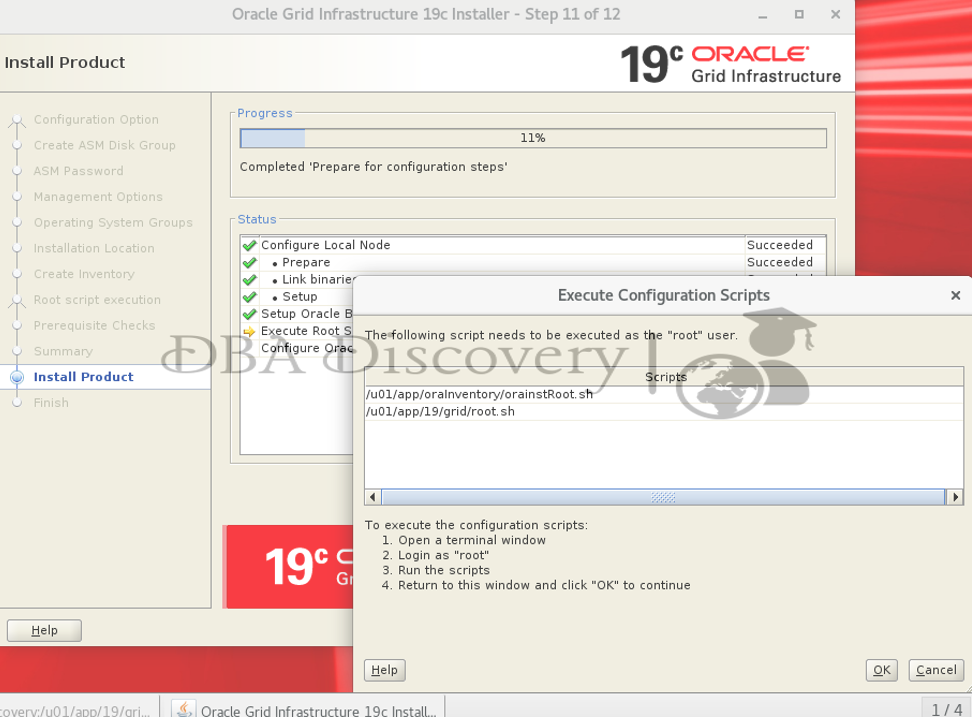
To execute the configuration script
1)Open a terminal window, Login as the root user and run both scripts one by one.
[root@dbadiscovery ~]# /u01/app/oraInventory/orainstRoot.sh
Changing permissions of /u01/app/oraInventory.
Adding read,write permissions for group.
Removing read,write,execute permissions for world.

Changing groupname of /u01/app/oraInventory to oinstall.
The execution of the script is complete.
[root@dbadiscovery ~]#


[root@dbadiscovery ~]# /u01/app/19/grid/root.sh
Performing root user operation.

The following environment variables are set as:
    ORACLE_OWNER= grid
    ORACLE_HOME=  /u01/app/19/grid

Enter the full pathname of the local bin directory: [/usr/local/bin]:
   Copying dbhome to /usr/local/bin ...
   Copying oraenv to /usr/local/bin ...
   Copying coraenv to /usr/local/bin ...


Creating /etc/oratab file...
Entries will be added to the /etc/oratab file as needed by
Database Configuration Assistant when a database is created
Finished running generic part of root script.
Now product-specific root actions will be performed.
Using configuration parameter file: /u01/app/19/grid/crs/install/crsconfig_params
The log of current session can be found at:
  /u01/app/grid/crsdata/dbadiscovery/crsconfig/roothas_2025-07-31_02-45-21AM.log
2025/07/31 02:45:23 CLSRSC-363: User ignored prerequisites during installation
LOCAL ADD MODE
Creating OCR keys for user 'grid', privgrp 'oinstall'..
Operation successful.
LOCAL ONLY MODE
Successfully accumulated necessary OCR keys.
Creating OCR keys for user 'root', privgrp 'root'..
Operation successful.
CRS-4664: Node dbadiscovery successfully pinned.
2025/07/31 02:45:28 CLSRSC-330: Adding Clusterware entries to file 'oracle-ohasd.service'

dbadiscovery     2025/07/31 02:45:59     /u01/app/grid/crsdata/dbadiscovery/olr/backup_20250731_024559.olr     724960844
2025/07/31 02:45:59 CLSRSC-327: Successfully configured Oracle Restart for a standalone server
[root@dbadiscovery ~]#
Return to the GUI window and click okay to continue the installation
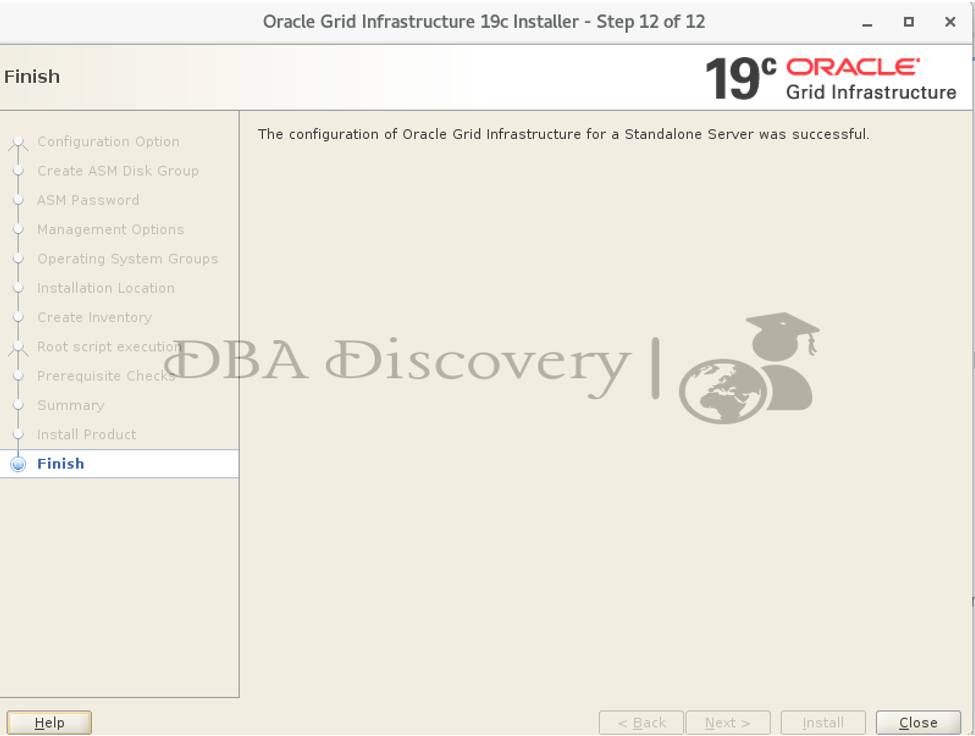
ASM installation is completed successfully.
You can verify using the command pmon
[grid@dbadiscovery ~]$ ps -ef | grep pmon
grid      3086     1  0 01:22 ?        00:00:00 asm_pmon_+ASM
grid      4612  4115  0 01:23 pts/0    00:00:00 grep --color=auto pmon
Oracle Database Software Installation
Go to the software folder and extract the Oracle Database software into the Oracle home location
[oracle@dbadiscovery db_home]$ unzip V982063-01.zip -d /u01/app/oracle/product/19/db_home/

[oracle@dbadiscovery 19c]$ cd /u01/app/oracle/product/19/db_home/
[oracle@dbadiscovery db_home]$ ./runInstaller
 Launching Oracle Database Setup Wizard...
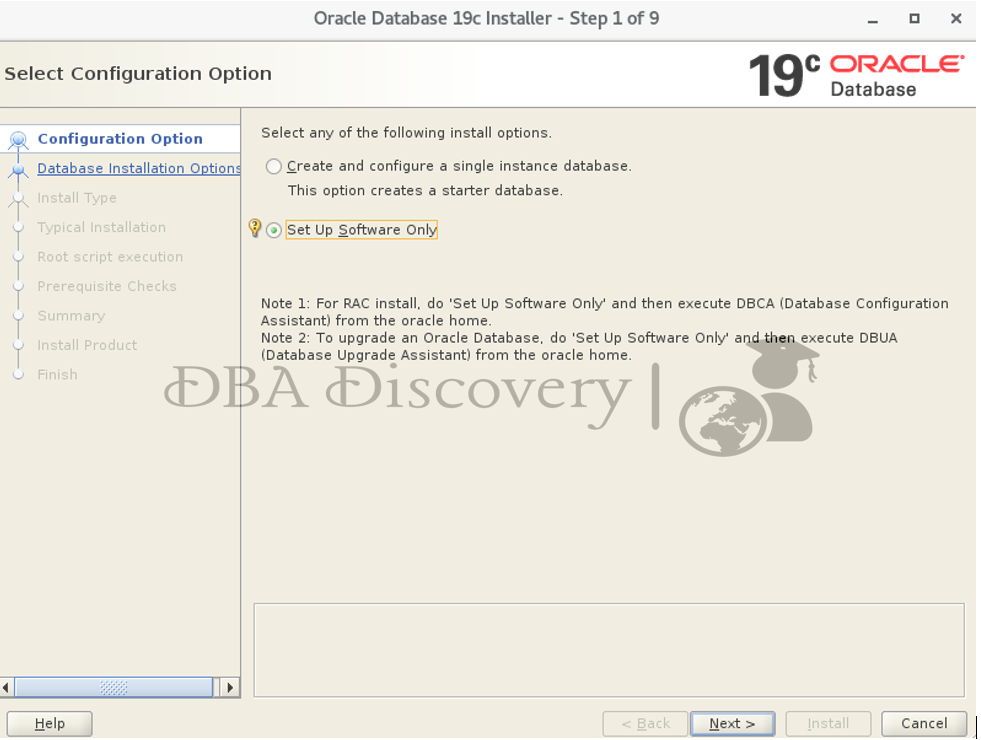
Screen 1: Select Configuration Option
Select the “Setup Software Only” option. Then, click the “Next” button.
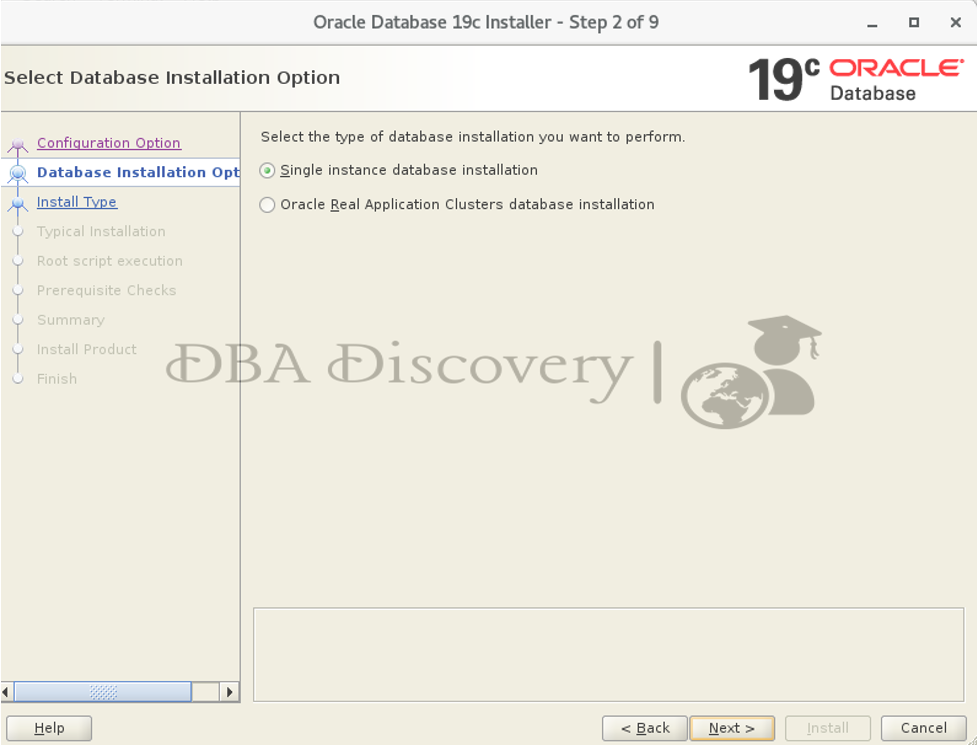
Screen 2: Select the Database Installation Option
Select the “Single Instance Database Installation” option, then click “Next.”
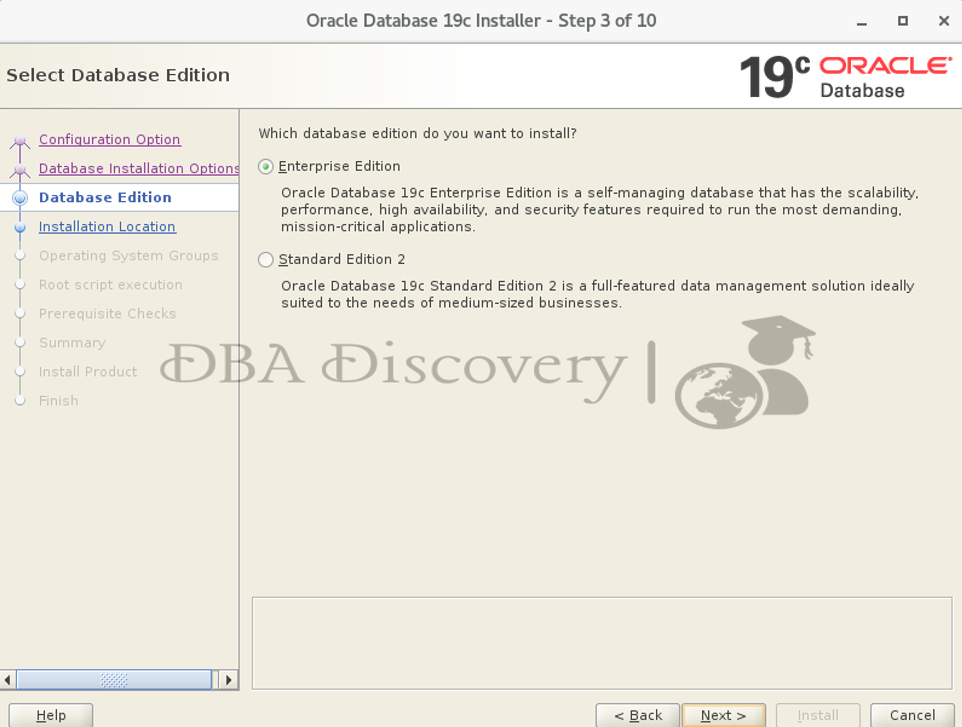
Screen 3: Select the Database Edition
Choose the edition type. I recommend selecting “Enterprise Edition.” However, you can select the one that suits your environment best, and then click Next.
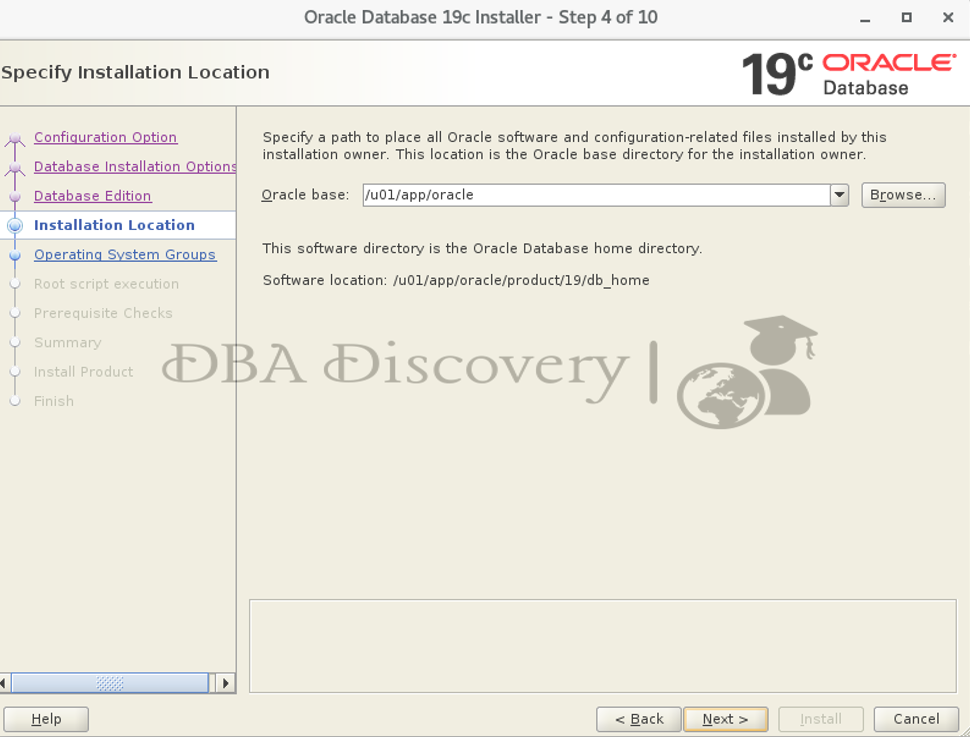
Screen 4: Specify Installation Location
Verify the Oracle home and base location. You can change the Oracle base if it shows an incorrect location. After you make your changes, click the Next button to proceed.
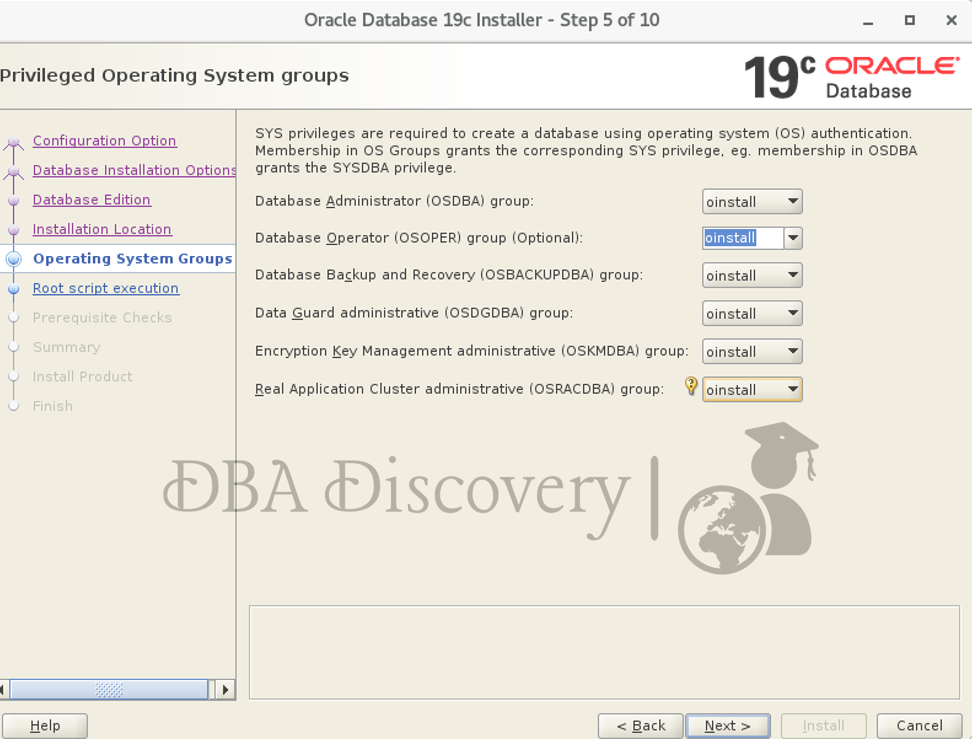
Screen 5: Privileged Operating System Groups
Choose the appropriate group according to your configuration and environment
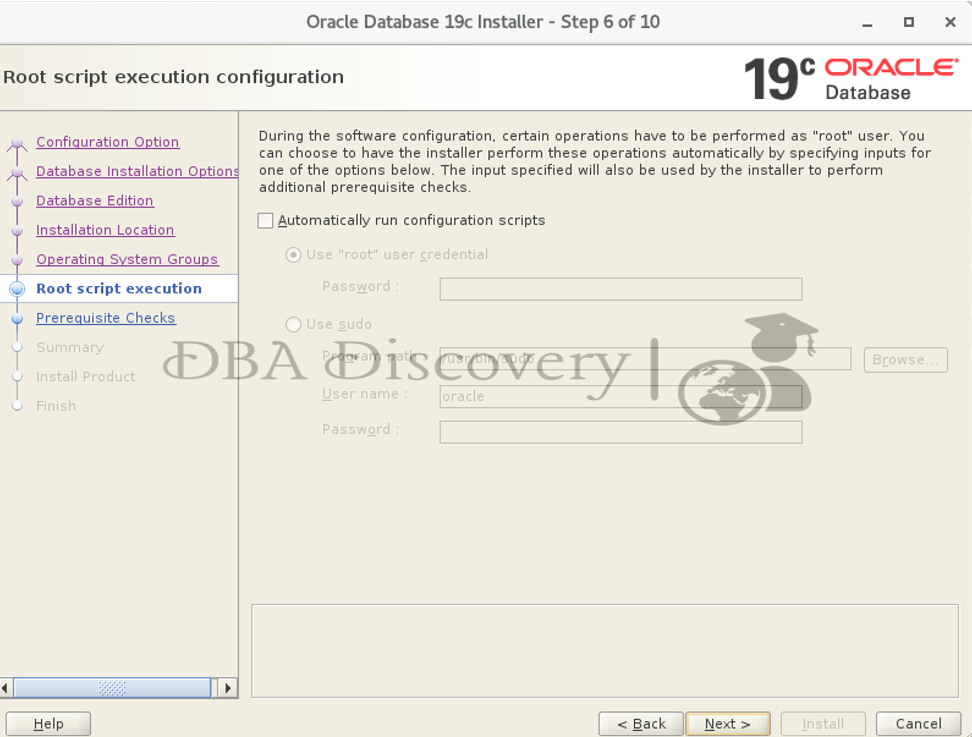
Screen 6: Root Script Execution Configuration
I’ll Uncheck the option to run the root scripts automatically. I will run them manually later. Click the Next button to continue.
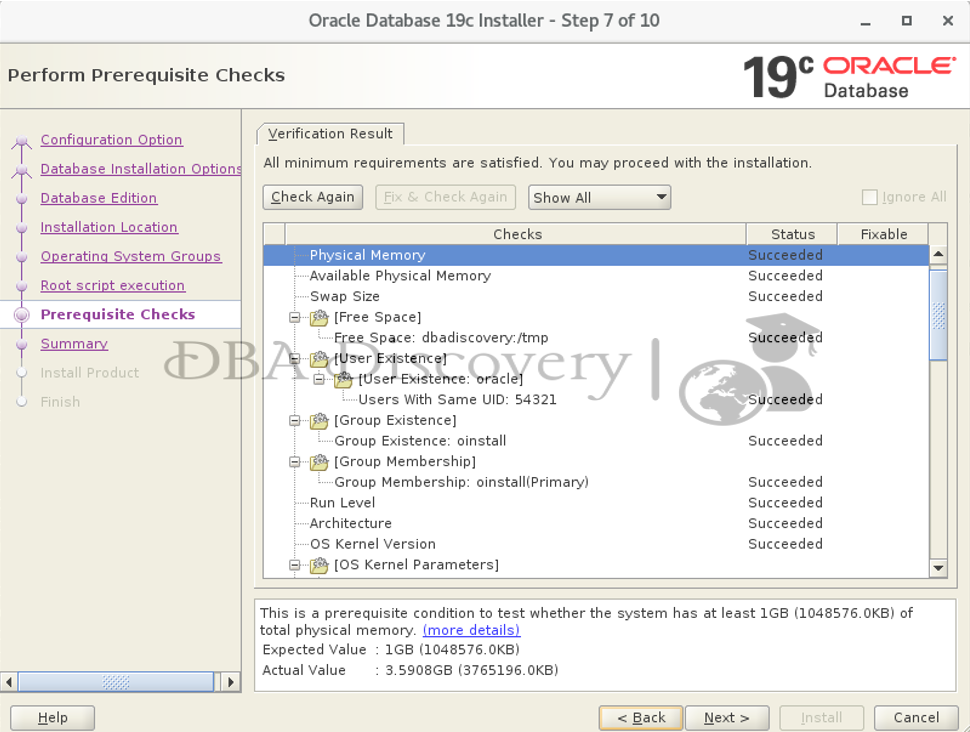
Screen 7: Perform Prerequisite Checks
Review and fix the issues listed in the following table and recheck the system.
Hence, there are no prerequisite checks failed, click next to proceed.
Screen 8: Oracle Gird Infrastructure 19c Installer
click the Next button to proceed Installation

To execute the configuration script
1)Open a terminal window, Login as the root user and run both scripts one by one.
[root@dbadiscovery ~]# /u01/app/oracle/product/19/db_home/root.sh
Performing root user operation.
The following environment variables are set as:
    ORACLE_OWNER= oracle
    ORACLE_HOME=  /u01/app/oracle/product/19/db_home
Enter the full pathname of the local bin directory: [/usr/local/bin]:
The contents of "dbhome" have not changed. No need to overwrite.
The contents of "oraenv" have not changed. No need to overwrite.
The contents of "coraenv" have not changed. No need to overwrite.
Entries will be added to the /etc/oratab file as needed by
Database Configuration Assistant when a database is created
Finished running generic part of root script.
Now product-specific root actions will be performed.
Oracle Trace File Analyzer (TFA - Standalone Mode) is available at :
    /u01/app/oracle/product/19/db_home/bin/tfactl

Note :
1. tfactl will use TFA Service if that service is running and user has been granted access
2. tfactl will configure TFA Standalone Mode only if user has no access to TFA Service or TFA is not installed
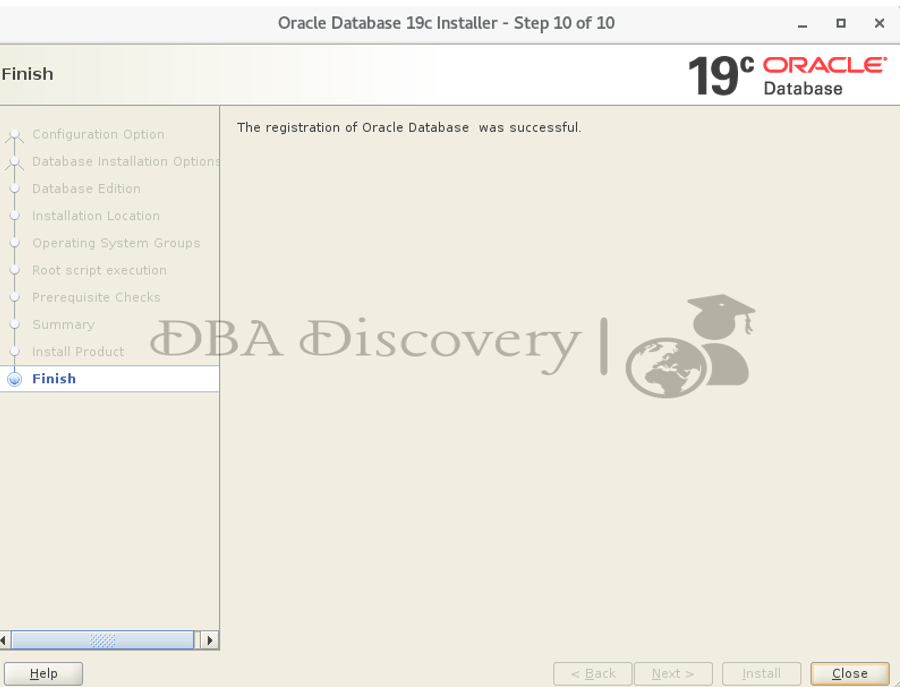
The installation has been completed successfully.
Oracle Database Installation
Navigate to the Oracle Home Bin Directory. Go to the bin directory of your Oracle Home. Run DBCA. Execute the following command to start the Database Configuration Assistant:
cd /u01/app/oracle/product/19/db_home/bin
[oracle@dbadiscovery db_home]$ cd bin/
[oracle@dbadiscovery bin]$ ./dbca
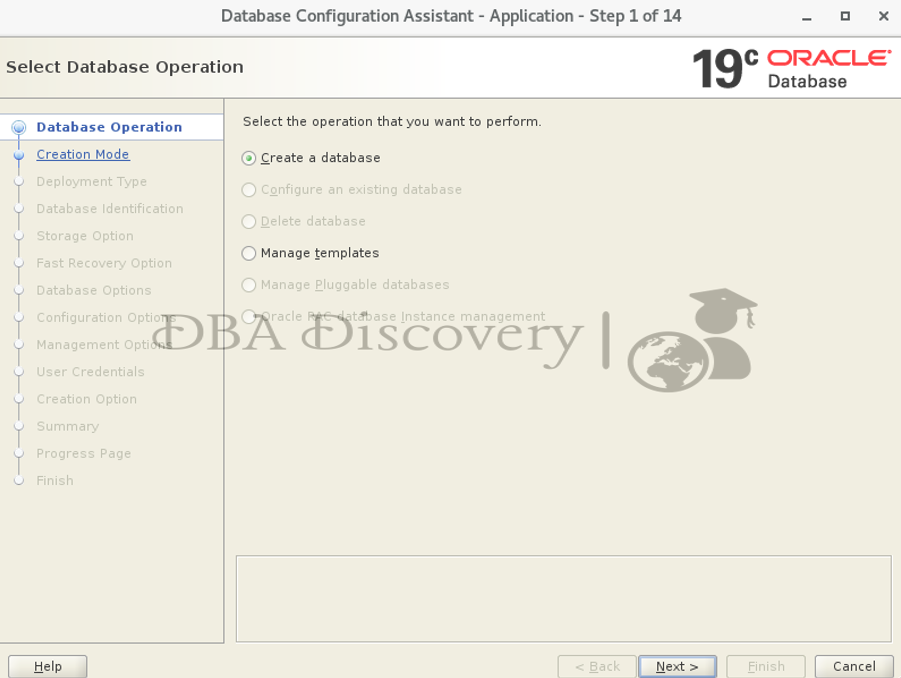
Screen 1: Select the Database Operation
In the DBCA welcome screen, choose “Create Database” as the operation you want to perform. Then, click “Next.”
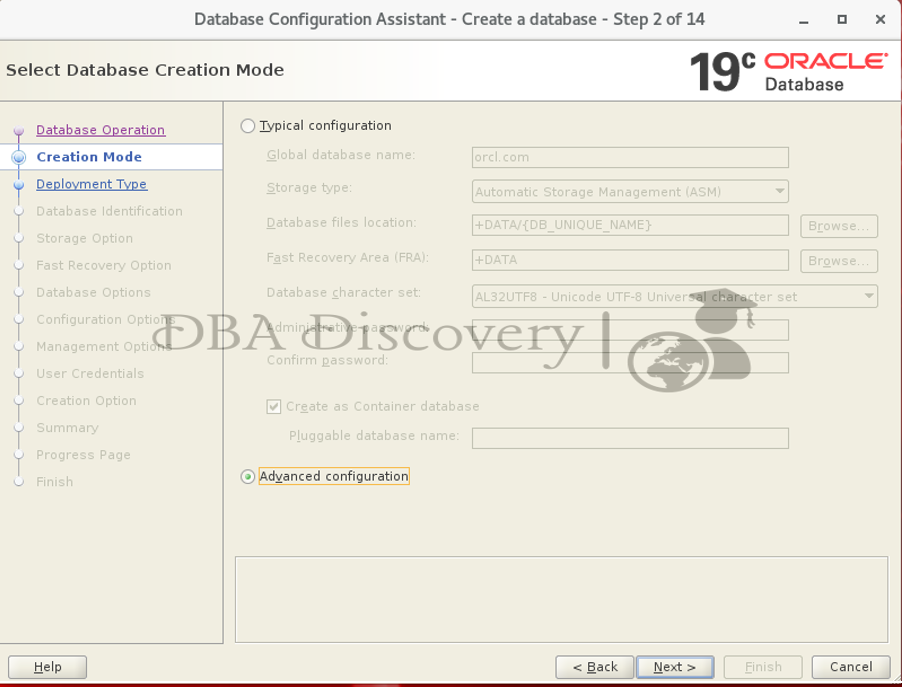
Screen 2: Select the Database Configuration Mode
Choose between “Typical Configuration” or “Advanced Configuration.” You can pick either option depending on what you need. I’ll select “Advanced Configuration.” Click “Next.”
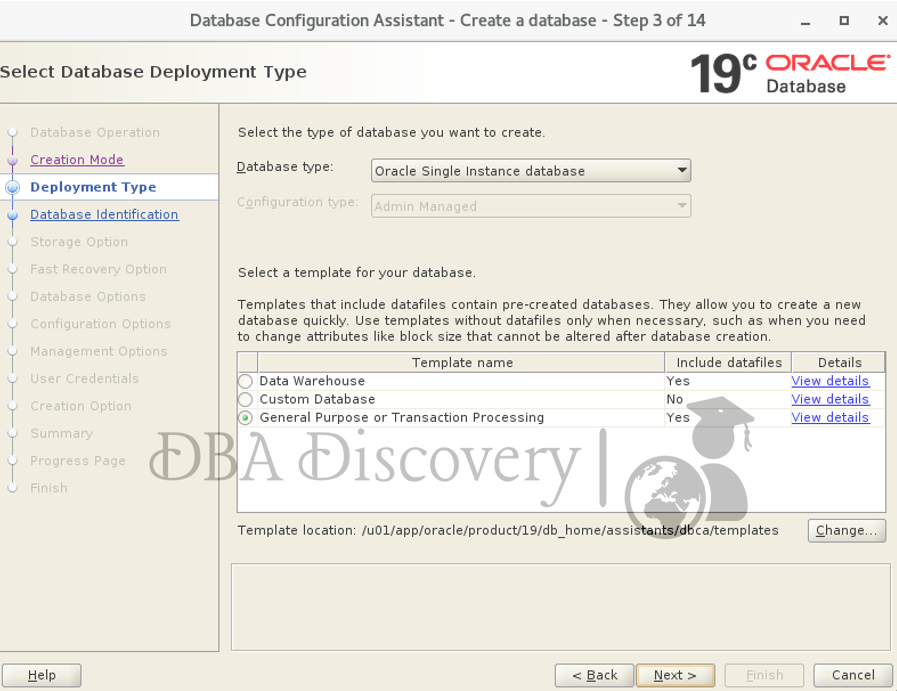
Screen 3: Select the Database Development Type
Choose “General Purpose” or “Transaction Processing.” Then, click “Next.”
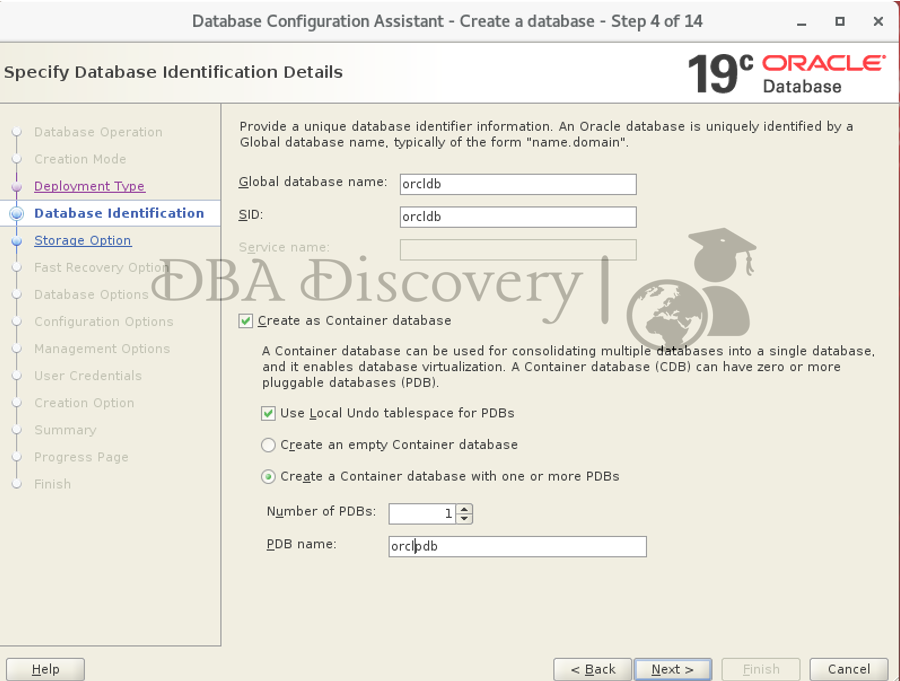
Screen 4: Specify the Database Identifier Details
Enter the Global Database Name and the SID. If you want to create a container database, provide the number of PDBs and their names. Click “Next.”
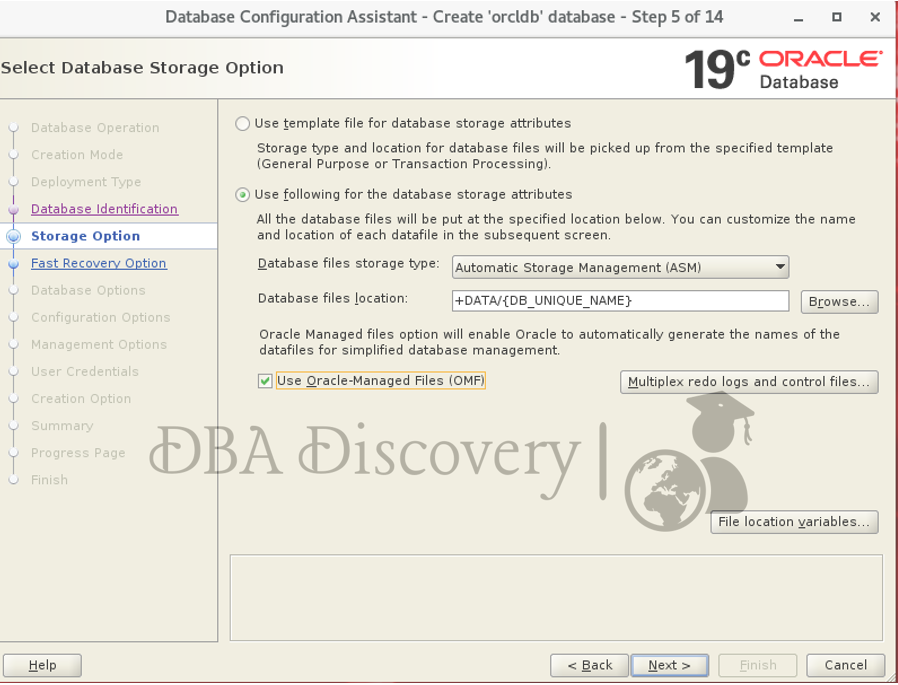
Screen 5: Select Database Storage Option
Check the database file location on the disk and set it to your preferences. Make sure the storage options meet your needs. Click “Next.”
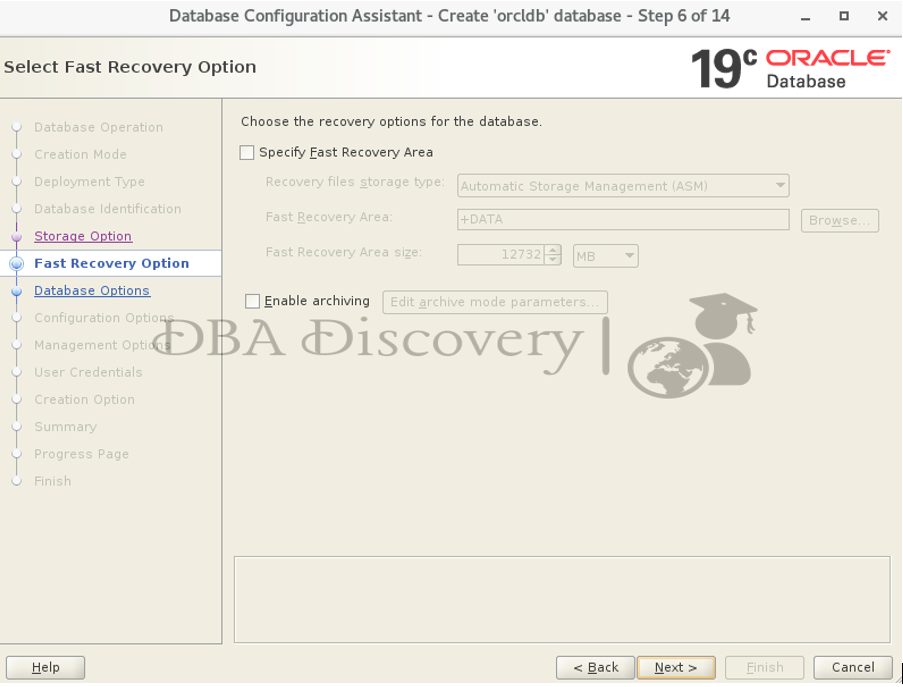
Screen 6: Fast Recovery Option
Since this is a test setup, I did not enable FRA. If you want to enable it, verify the disk settings, including size and format. Then click Next.
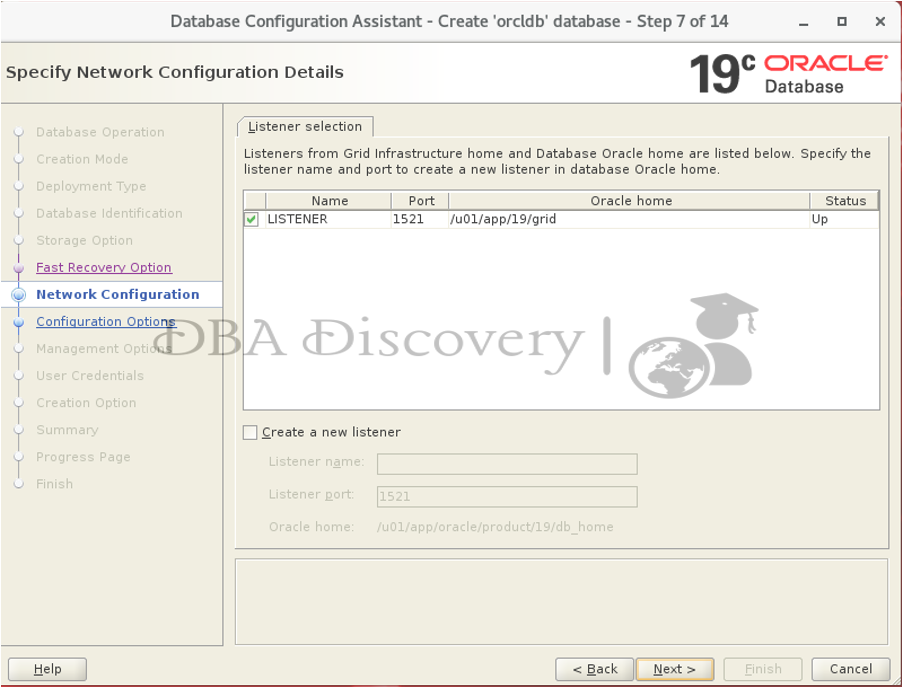
Screen 7: Specify Network Configuration Details
click the Next button to proceed.
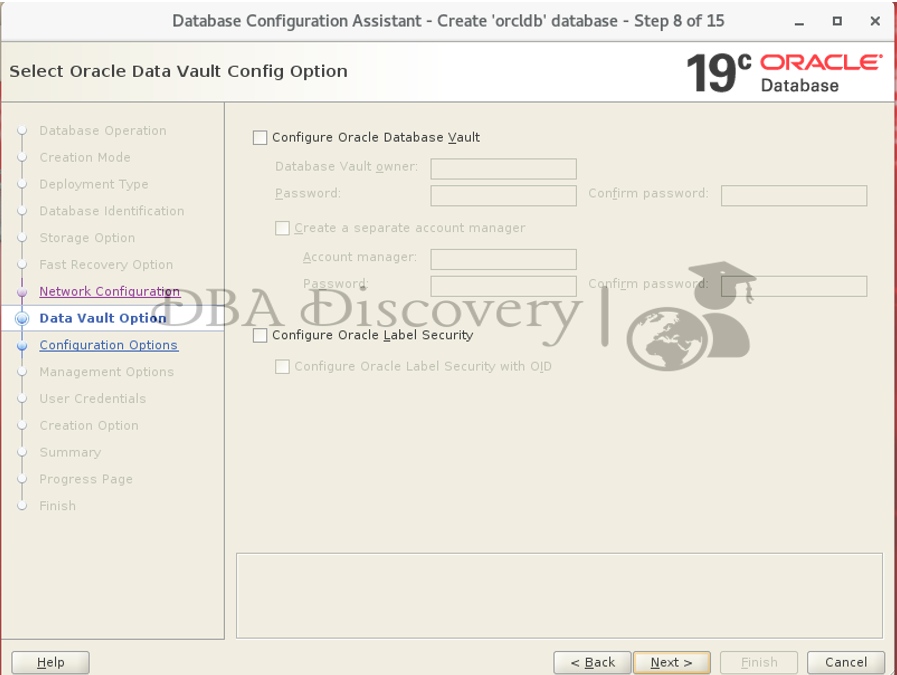
Screen 8: Select Oracle Data Vault Config Option
click the Next button to proceed.
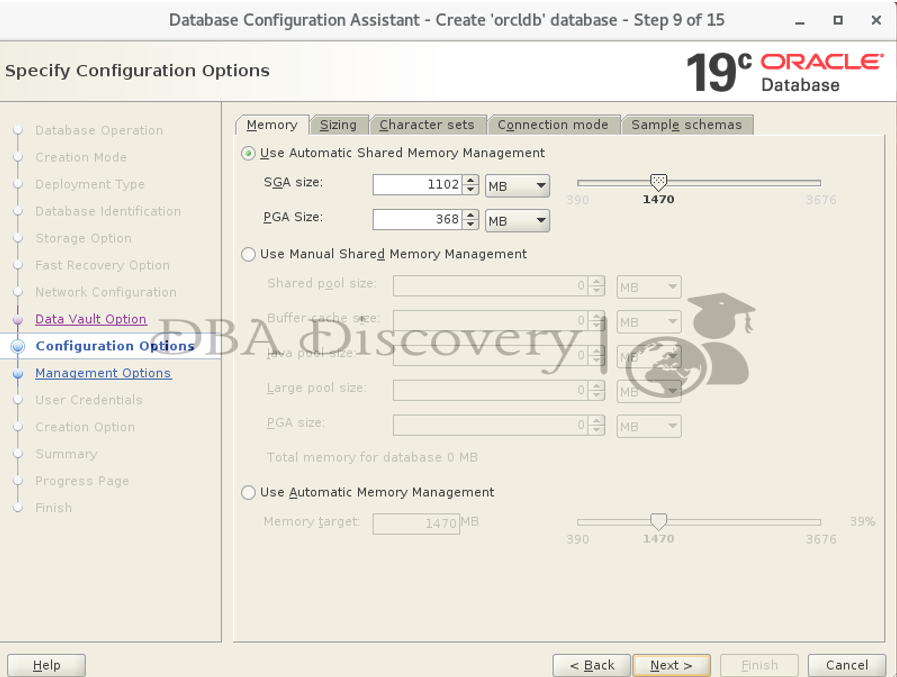
Screen 9: Specify the Configuration Option
Set the size for the SGA (System Global Area) and PGA (Program Global Area) as needed. Click “Next.”
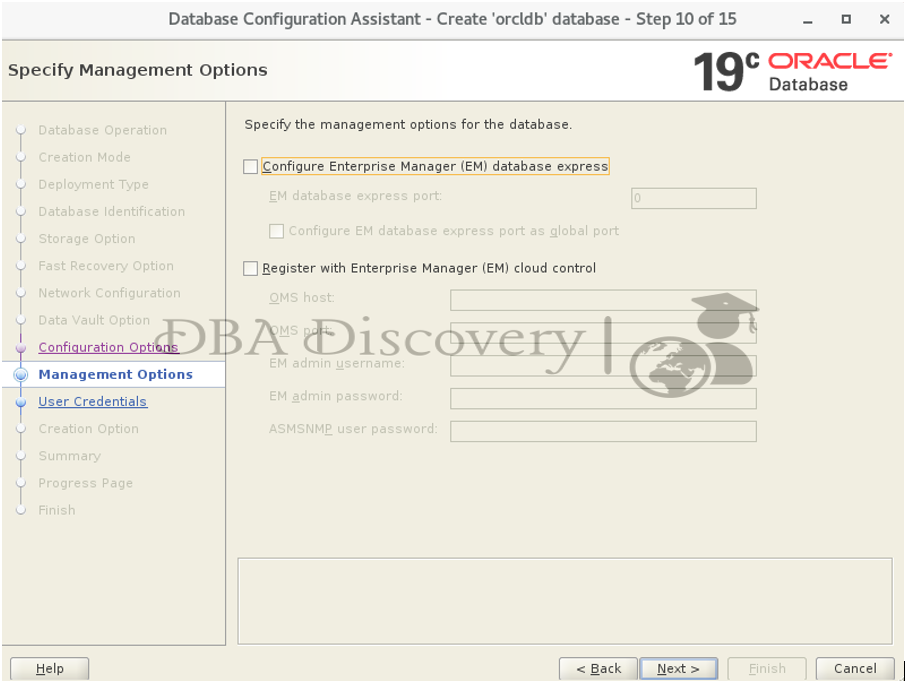
Screen 10: Specify Management Options
click the Next button to proceed.
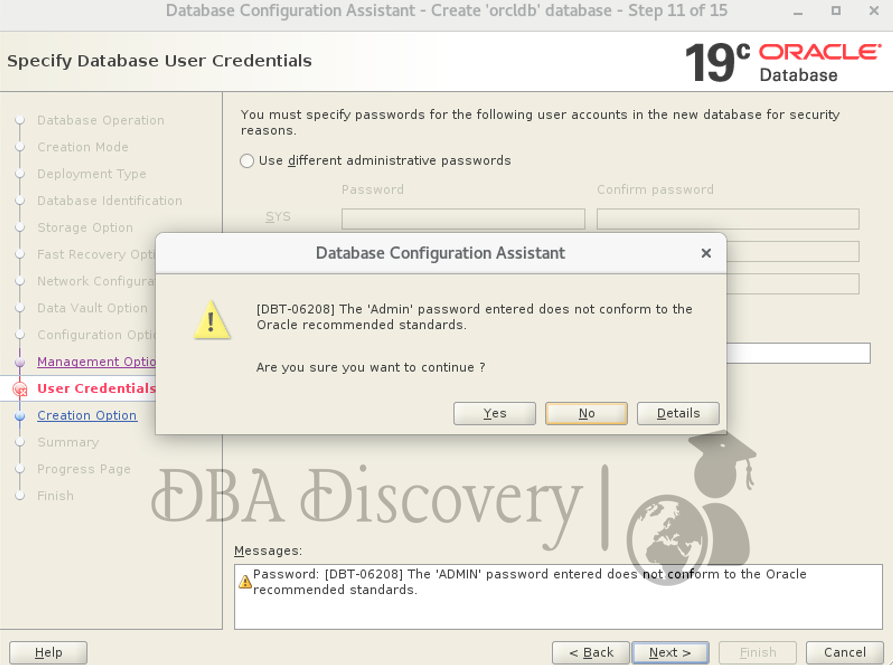
Screen 11: Specify Database User Credentials
Select “Use Same Password for these Accounts.” Enter the password and confirm it. Then click Next and Yes to continue
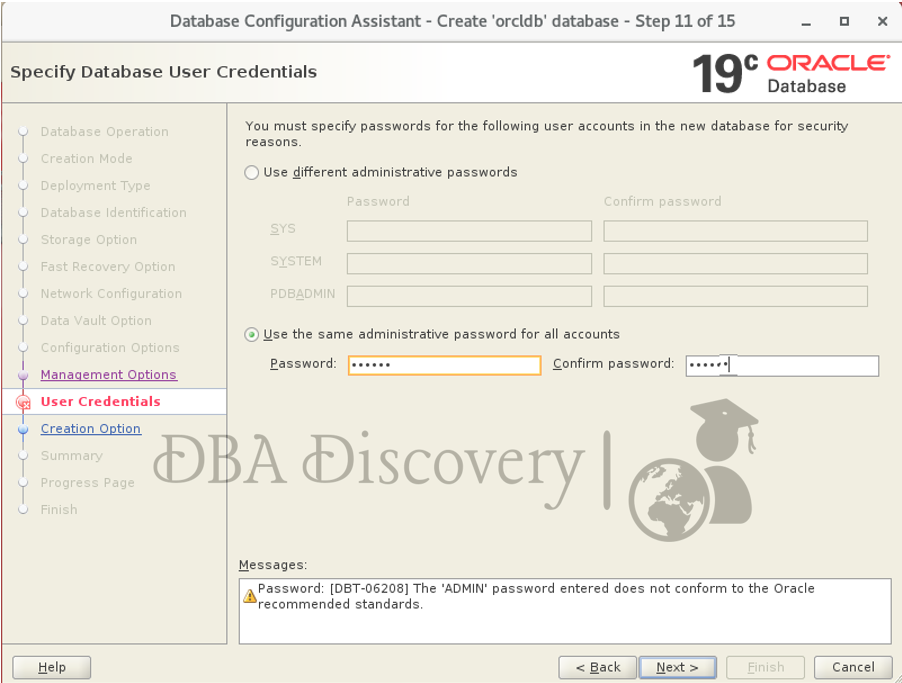
Note: If the password is simple, you might receive error INS-30011. You can either ignore it and click on Yes or choose a stronger password according to Oracle guidelines.
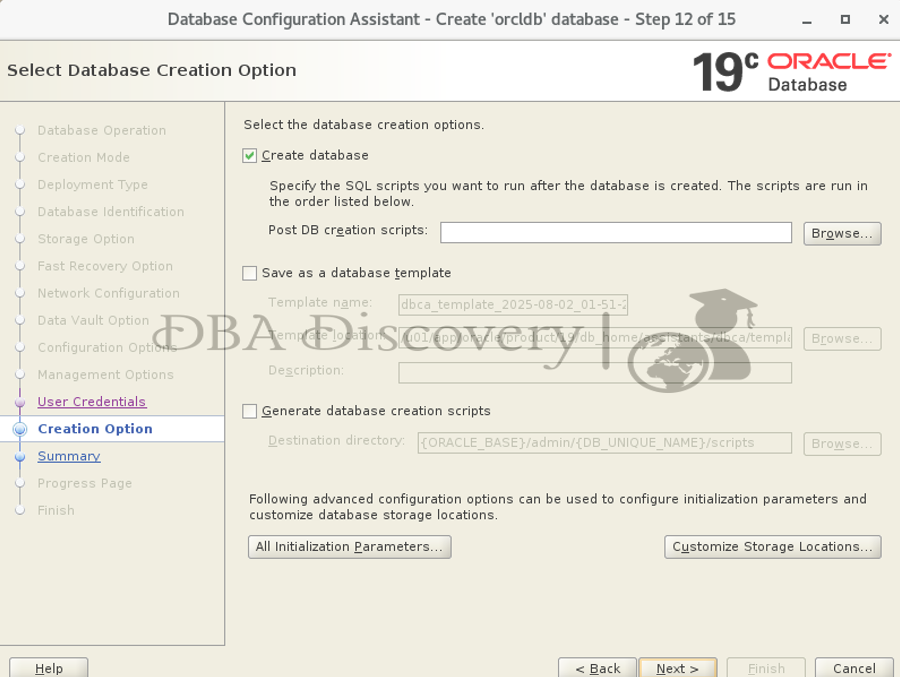
Screen 12: Database Creation Options
Choose the default settings for creating the database, Click “Next” to proceed.
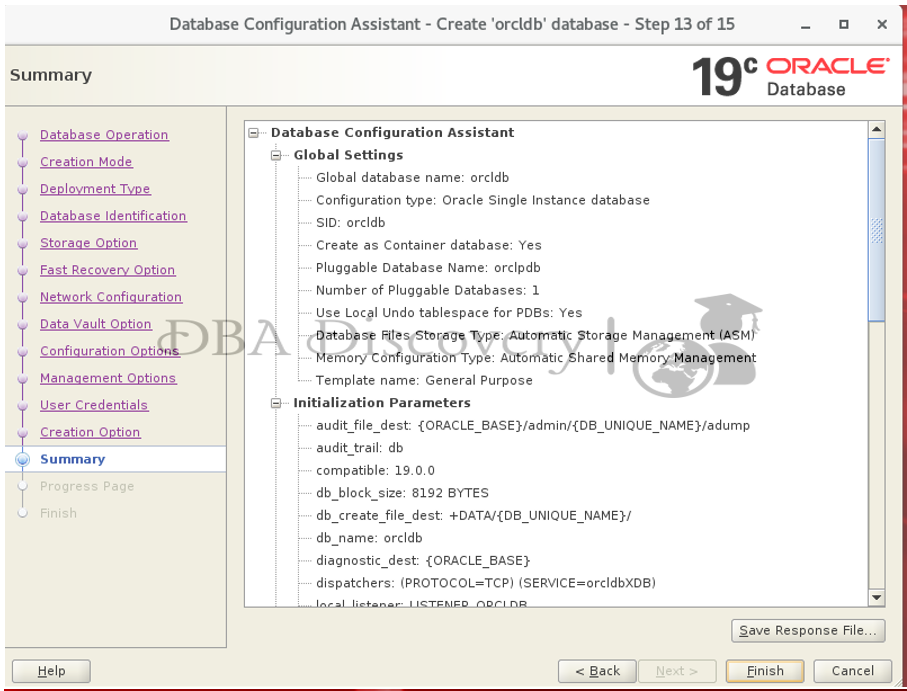
Screen 13: Summary
Review the installation summary to ensure all settings are correct. Once you have verified the details, click the Install button to begin the installation process
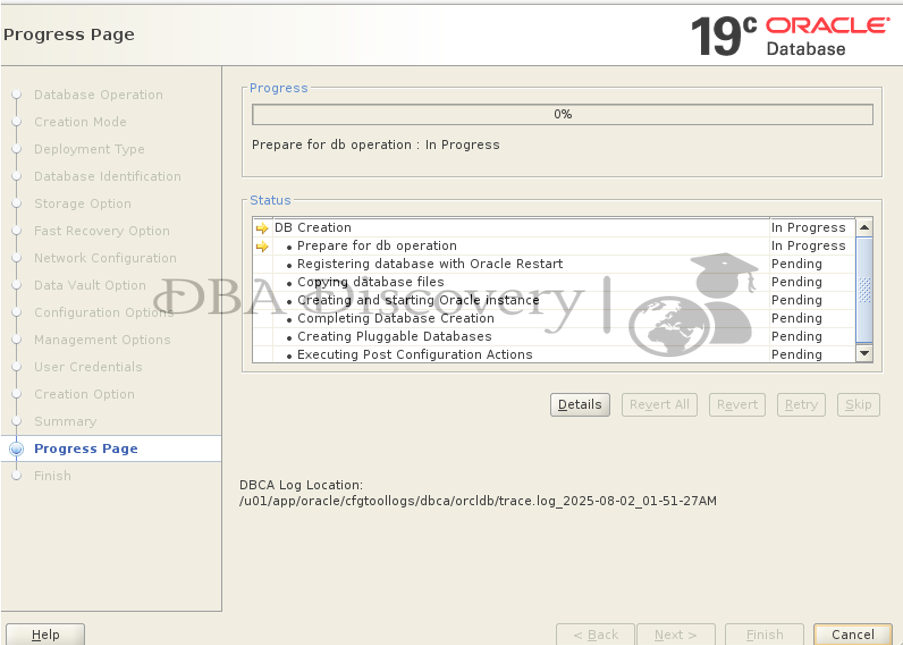
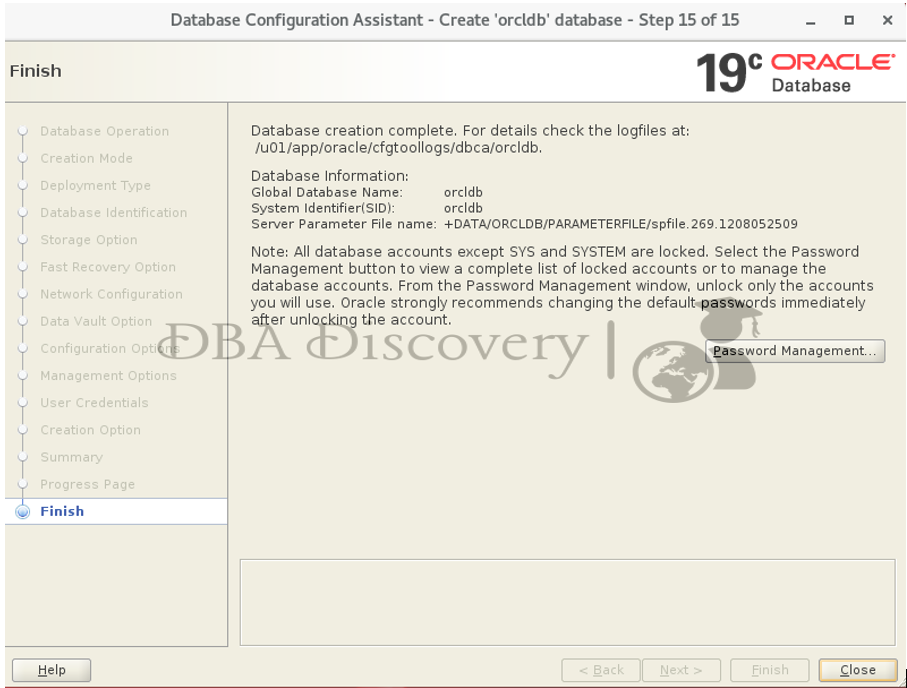
Congratulations! The installation has been completed successfully.
Alert: The information provided on this website is for educational purposes only. It has been tested internally, but there is no guarantee it will work in every environment. It is strongly recommended to first test the process in a non-production environment, such as a User Acceptance Testing (UAT) setup. This allows you to verify configurations, identify any issues, and ensure a smooth transition to production, minimizing the risk of disruptions in your live environment. Always conduct thorough testing before applying changes to production systems.