
Step-by-Step Guide to Grid Installation in GUI Mode
Start the Installation
As the Grid user, navigate to the directory where you unzipped the Oracle Grid Infrastructure software, which should be in the Grid home directory
Run the following command to start the installation process:
./gridSetup.sh
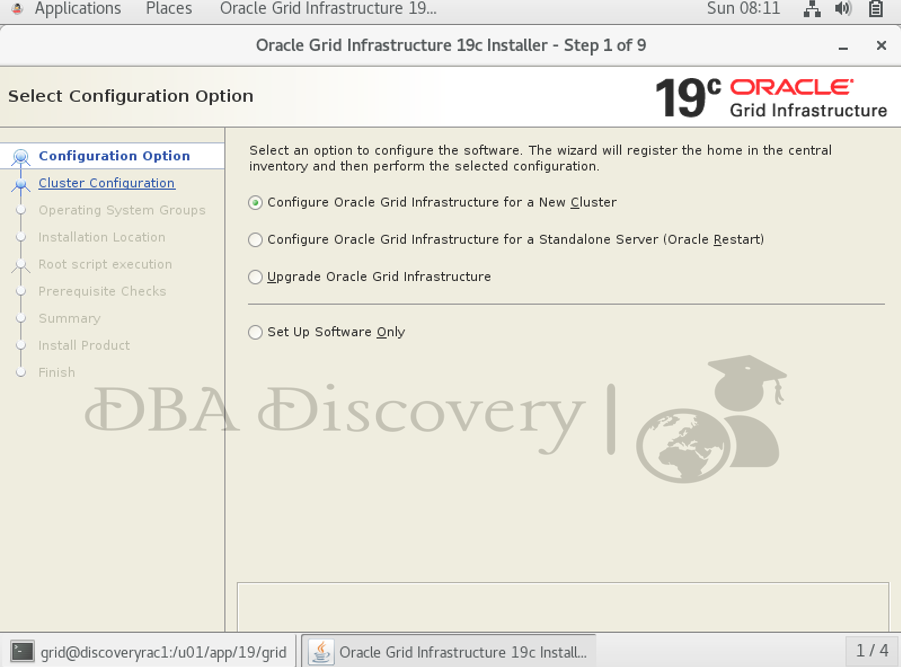
Screen 1: Select Configuration Option
On the first screen, select Configure Oracle Grid Infrastructure for a New Cluster and click Next to proceed with the installation
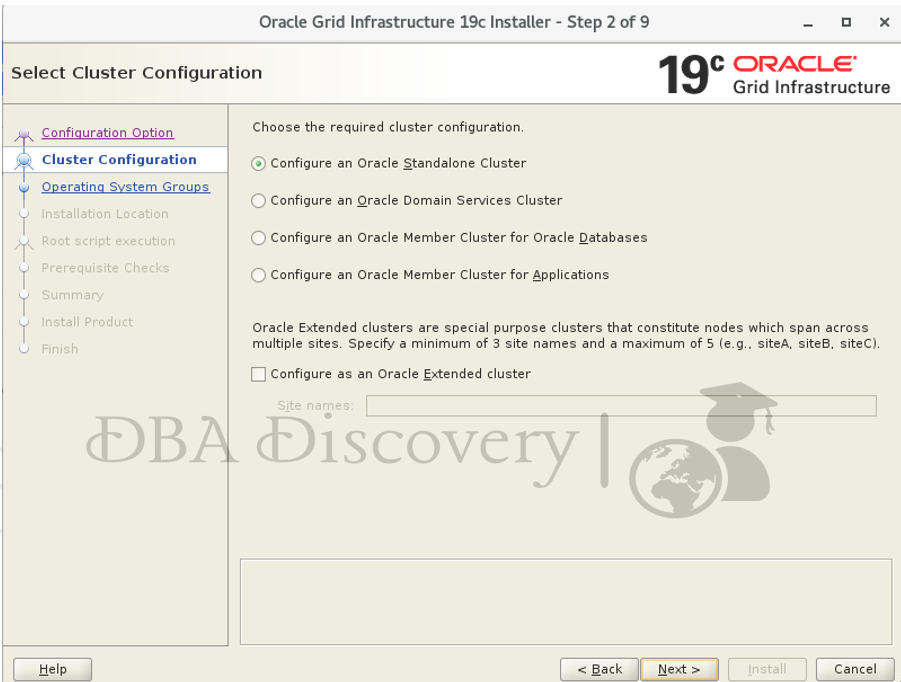
Screen 2: Select Cluster Configuration
Select Configure an Oracle Standalone Cluster and click Next to continue with the configuration process
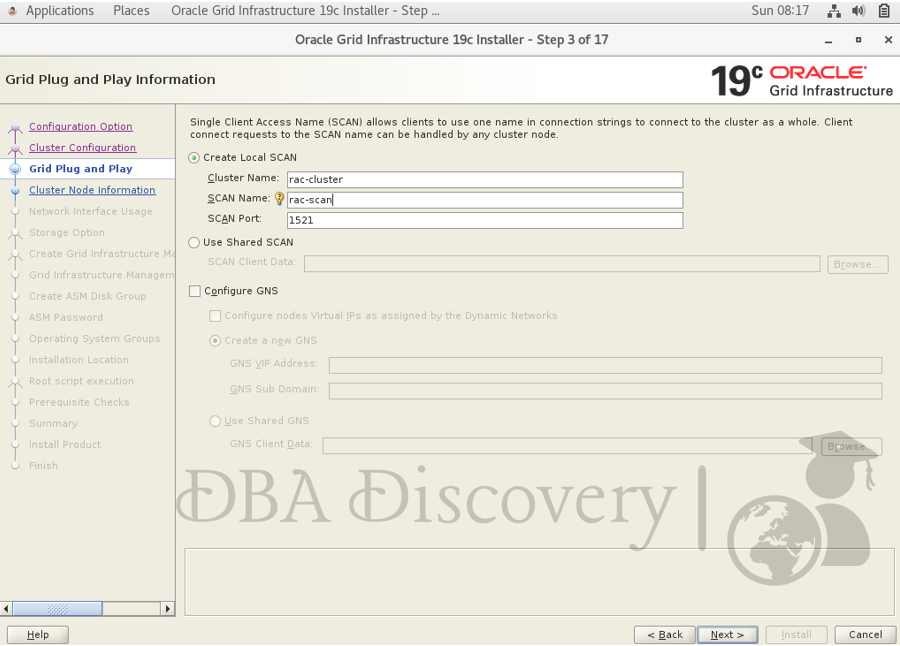
Screen 3: Grid Plug and Play Information
Change the SCAN name and Cluster name according to your environment. Click Next to proceed.
Note: Ensure the Cluster name does not exceed 15 characters and choose a name that is convenient for you. Click Next to proceed
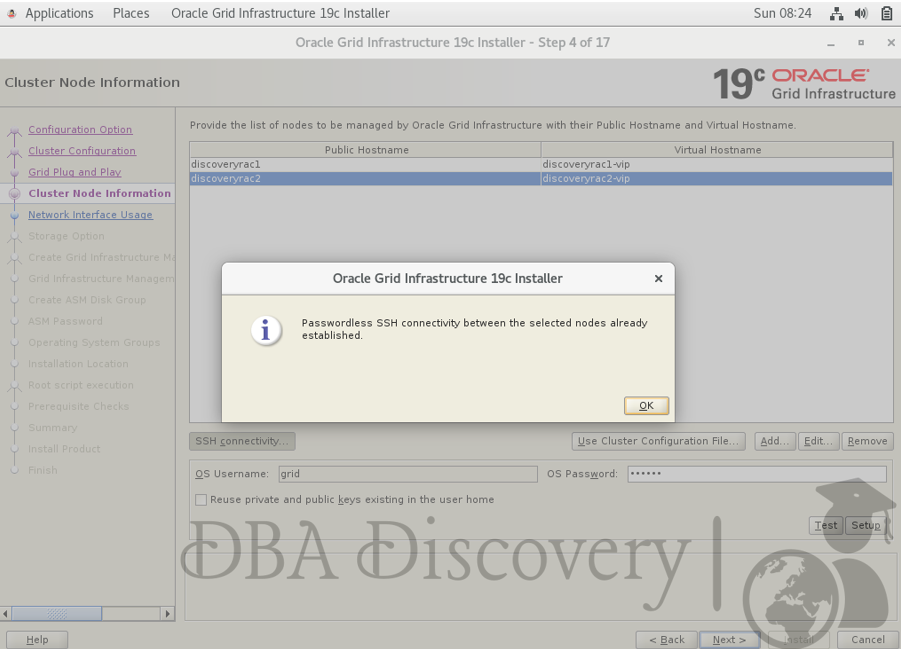
Screen 4: Cluster Node Information
On the Cluster Node Information screen, click the Add button. Enter the details for the second node in the cluster, including the public hostname and virtual hostname, then click the OK button to save the information.
Note: You can set up the SSH connectivity here. If you don’t, the next step will validate the connectivity and report any errors found
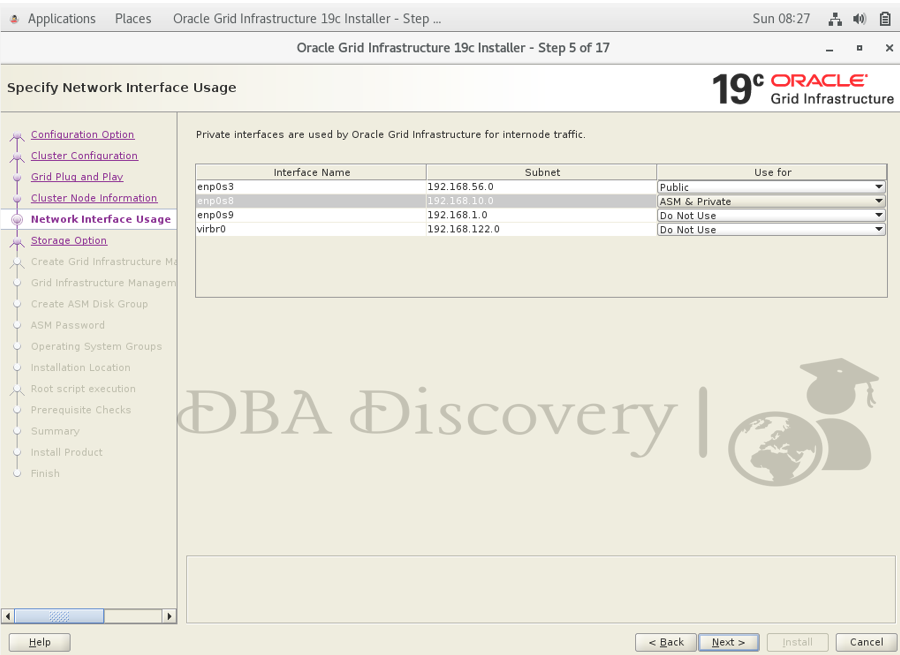
Screen 5: Specify Network Interface Usage
Check that the public and private networks are specified correctly. For the public network, select the Public option, and for the private network, select ASM & Private. Then click Next to continue.
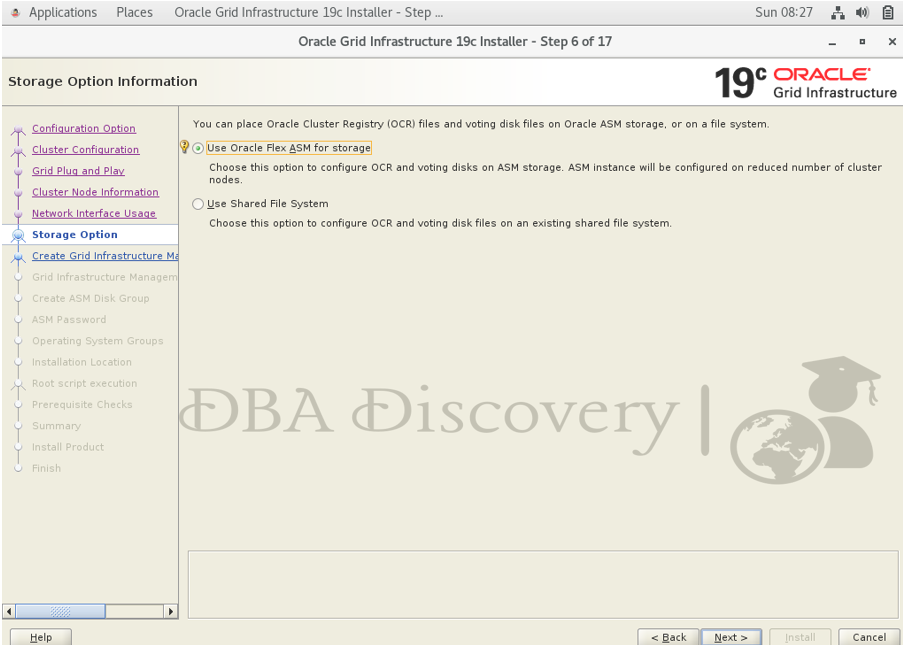
Screen 6: Storage Option Information
Select the Oracle Flex ASM for the storage option and then click the Next button to proceed.
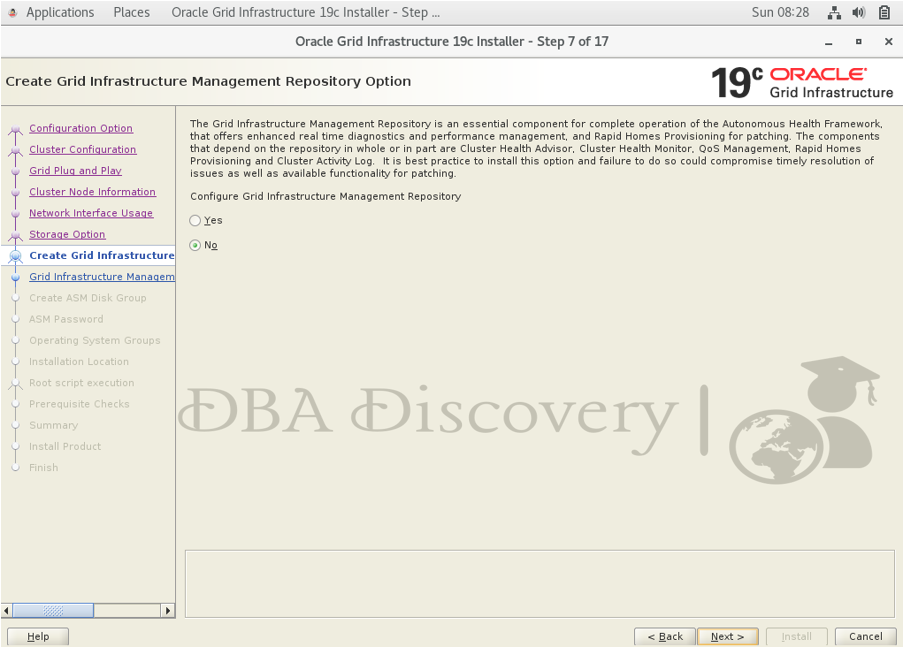
Screen 7: Create Grid Infrastructure Management Repository Option
Select No to indicate that you prefer not to create a separate disk group for the Grid Infrastructure Management Repository (GIMR). Then, click the Next button to move forward
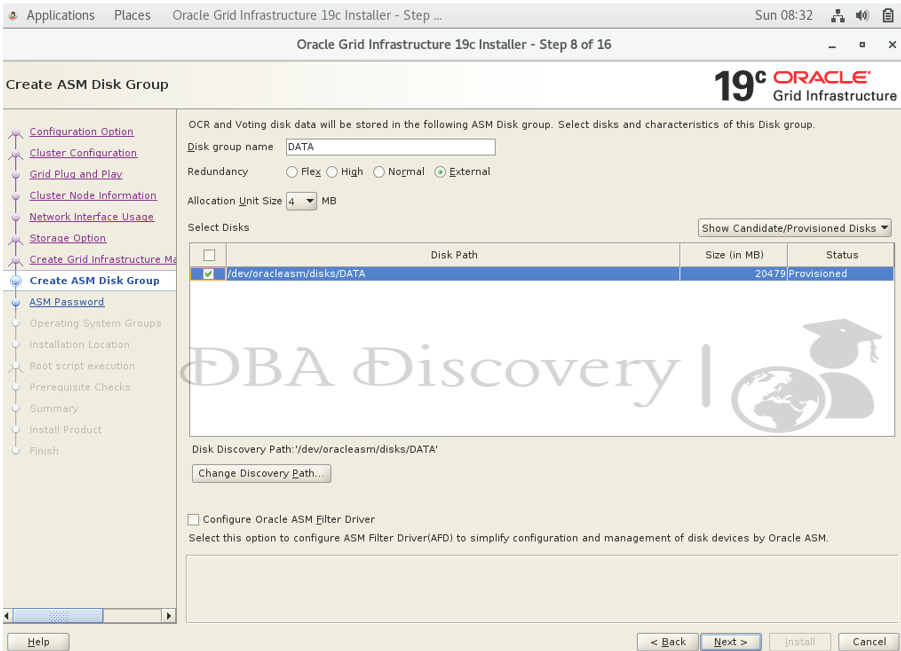
Screen 8: Create ASM Disk Group
Select the Discovery Path and add the path where the disks are located. In this case, enter /dev/oracleasm/disks/DATA. Also, select the Redundancy option as External since this is a practice environment. Then click the Next button to continue.
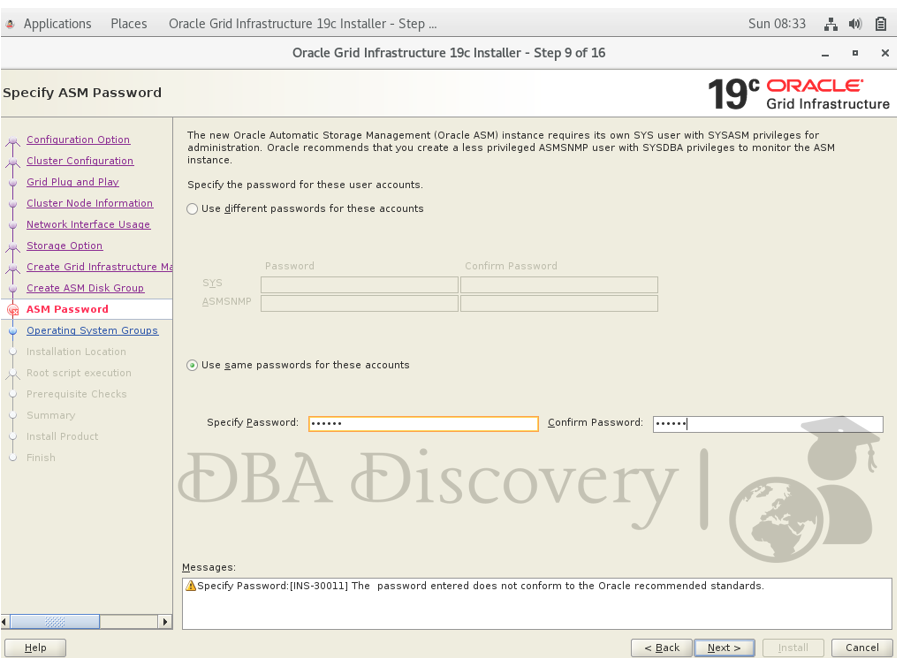
Screen 9: Specify the ASM Password
Select the option to Use the same password for these accounts and enter the desired password for the ASM accounts. Once you’ve entered the password, click the Next button to proceed.
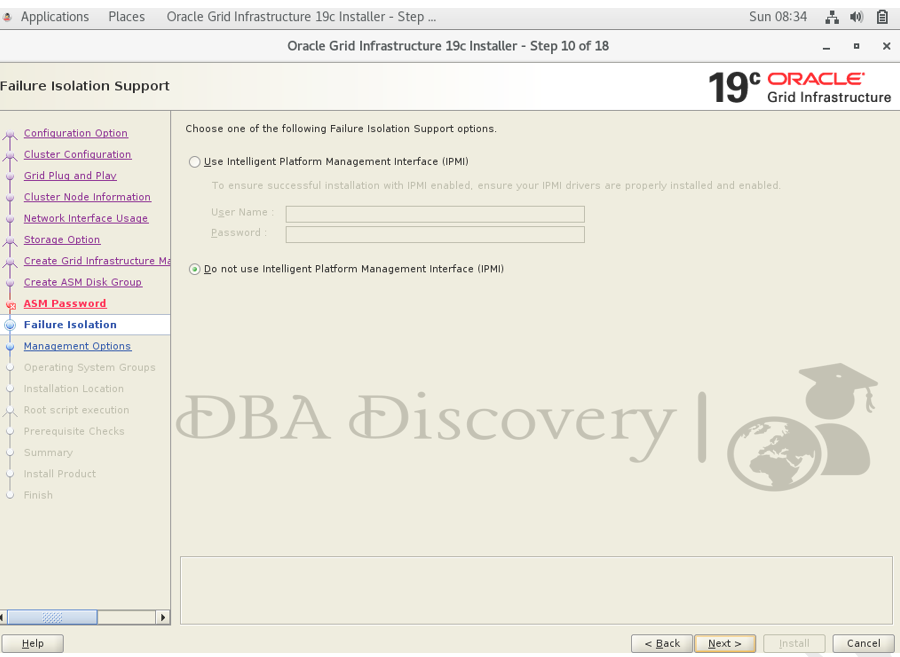
Screen 10: Failure Isolation Support
Select the default option for failure isolation support and then click the Next button to proceed
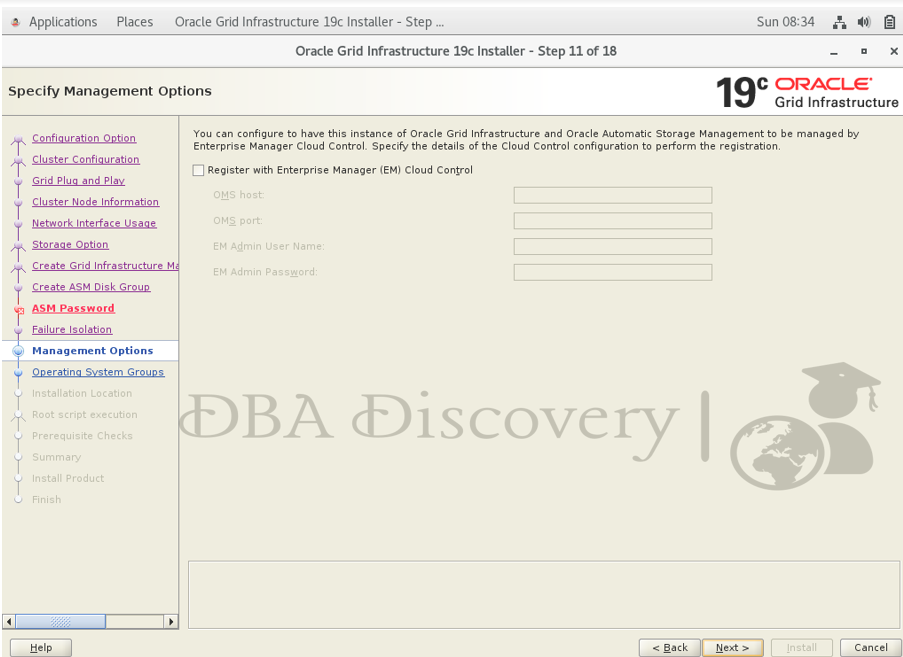
Screen 11: Specify Management Options
Uncheck the Enterprise Manager (EM) option, and then click the Next button to proceed
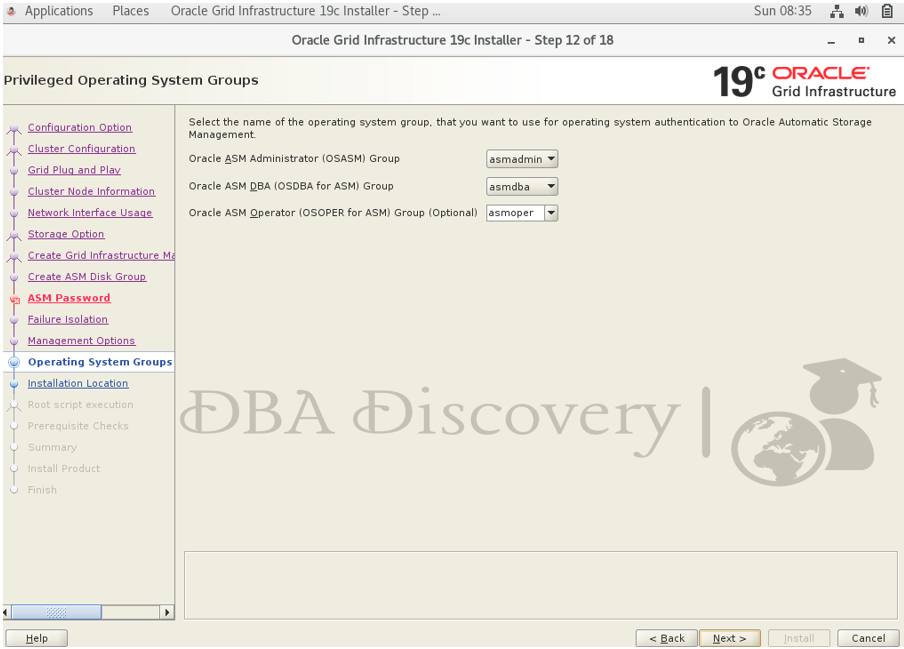
Screen 12: Privileged Operating System Groups
I’ll stick with the default settings for the privileged operating system groups; however, you can adjust them according to your environment as needed. Click the Next button to continue.
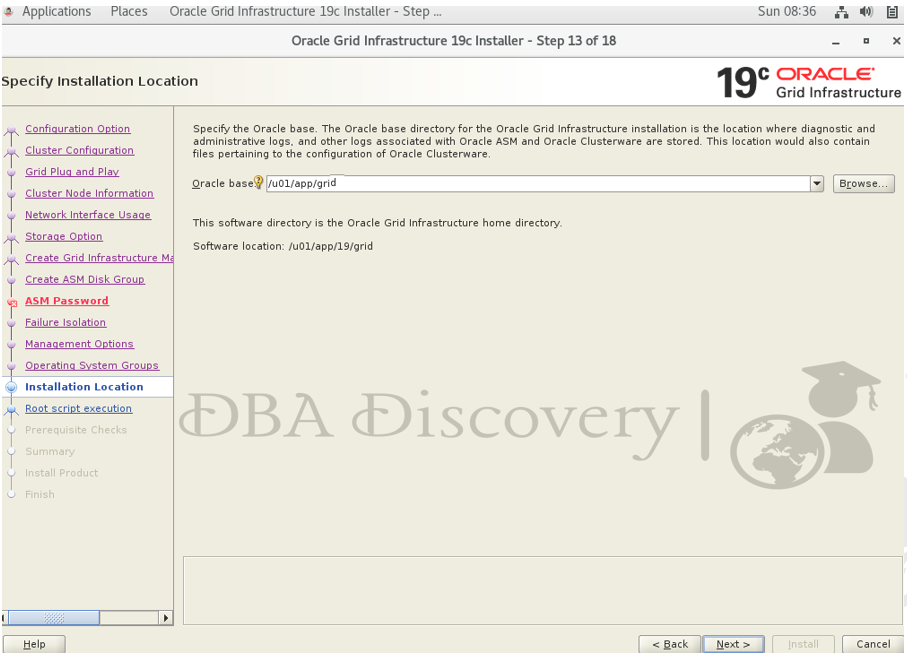
Screen 13: Specify Installation Location
You can modify the installation location based on your requirements or environment. Once you’ve made your changes, click the Next button to proceed.
Screen 14: Create Inventory
I’ll stick with the default path for the inventory location. Click the Next button to continue.

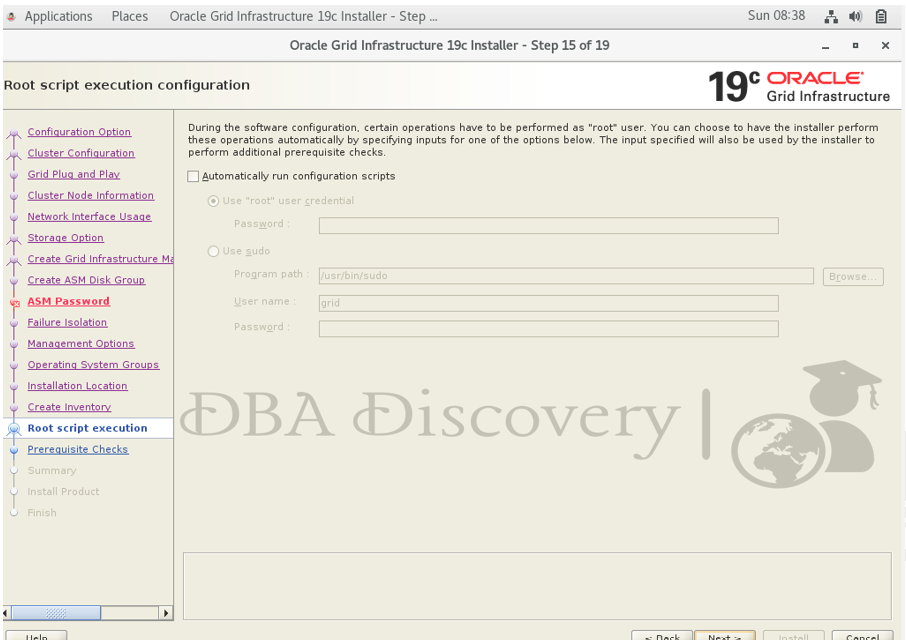
Screen 15: Root Script Execution Configuration
I’ll uncheck the option to run the root scripts automatically and will execute them manually later. Click the Next button to continue
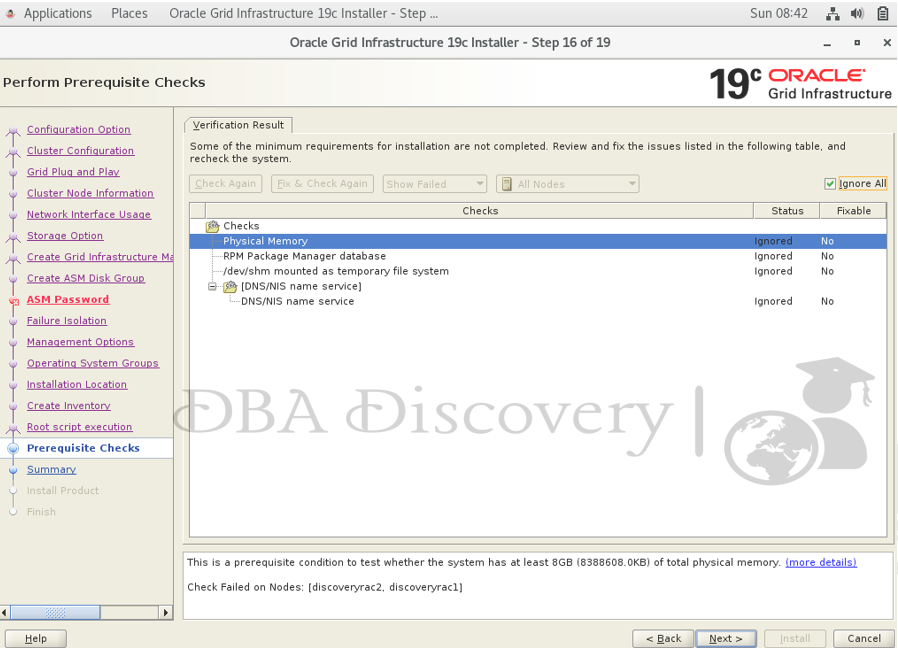
Screen 16: Perform Prerequisite Check
I haven’t configured the DNS yet, but I’ll write a post on how to do that soon. Additionally, I’ve resolved the /dev/shm issue. While this isn’t mandatory for installation, it’s better to address it beforehand.
For now, you can continue with the installation. Click Next to move forward. If you need guidance on resolving the /dev/shm issue, I’ve written a solution that you can search for and follow.
Screen 17: Summary
Review the installation summary to ensure all settings are correct. Once you have verified the details, click the Install button to begin the installation process

Root Script Output
This step ensures that my installation process is on track. Many people often get stuck at this point, so reviewing the output carefully can help identify and resolve any issues before proceeding. Once the process is successfully completed on both nodes, click “Okay” to continue
script /u01/app/oraInventory/orainstRoot.sh
[root@discoveryrac1 ~]# /u01/app/oraInventory/orainstRoot.sh
Changing permissions of /u01/app/oraInventory.
Adding read,write permissions for group.
Removing read,write,execute permissions for world.

Changing groupname of /u01/app/oraInventory to oinstall.
The execution of the script is complete.
script /u01/app/19/grid/root.sh
[root@discoveryrac1 ~]# /u01/app/19/grid/root.sh
Performing root user operation.

The following environment variables are set as:
    ORACLE_OWNER= grid
    ORACLE_HOME=  /u01/app/19/grid

Enter the full pathname of the local bin directory: [/usr/local/bin]:
   Copying dbhome to /usr/local/bin ...
   Copying oraenv to /usr/local/bin ...
   Copying coraenv to /usr/local/bin ...


Creating /etc/oratab file...
Entries will be added to the /etc/oratab file as needed by
Database Configuration Assistant when a database is created
Finished running generic part of root script.
Now product-specific root actions will be performed.
Relinking oracle with rac_on option
Using configuration parameter file: /u01/app/19/grid/crs/install/crsconfig_params
The log of current session can be found at:
  /u01/app/grid/crsdata/discoveryrac1/crsconfig/rootcrs_discoveryrac1_2024-10-06_08-50-11AM.log
2024/10/06 08:50:21 CLSRSC-594: Executing installation step 1 of 19: 'SetupTFA'.
2024/10/06 08:50:21 CLSRSC-594: Executing installation step 2 of 19: 'ValidateEnv'.
2024/10/06 08:50:21 CLSRSC-363: User ignored prerequisites during installation
2024/10/06 08:50:21 CLSRSC-594: Executing installation step 3 of 19: 'CheckFirstNode'.
2024/10/06 08:50:23 CLSRSC-594: Executing installation step 4 of 19: 'GenSiteGUIDs'.
2024/10/06 08:50:24 CLSRSC-594: Executing installation step 5 of 19: 'SetupOSD'.
2024/10/06 08:50:24 CLSRSC-594: Executing installation step 6 of 19: 'CheckCRSConfig'.
2024/10/06 08:50:24 CLSRSC-594: Executing installation step 7 of 19: 'SetupLocalGPNP'.
2024/10/06 08:50:48 CLSRSC-594: Executing installation step 8 of 19: 'CreateRootCert'.
2024/10/06 08:50:52 CLSRSC-4002: Successfully installed Oracle Trace File Analyzer (TFA) Collector.
2024/10/06 08:50:53 CLSRSC-594: Executing installation step 9 of 19: 'ConfigOLR'.
2024/10/06 08:51:05 CLSRSC-594: Executing installation step 10 of 19: 'ConfigCHMOS'.
2024/10/06 08:51:06 CLSRSC-594: Executing installation step 11 of 19: 'CreateOHASD'.
2024/10/06 08:51:11 CLSRSC-594: Executing installation step 12 of 19: 'ConfigOHASD'.
2024/10/06 08:51:11 CLSRSC-330: Adding Clusterware entries to file 'oracle-ohasd.service'
2024/10/06 08:51:34 CLSRSC-594: Executing installation step 13 of 19: 'InstallAFD'.
2024/10/06 08:51:39 CLSRSC-594: Executing installation step 14 of 19: 'InstallACFS'.
2024/10/06 08:51:45 CLSRSC-594: Executing installation step 15 of 19: 'InstallKA'.
2024/10/06 08:51:50 CLSRSC-594: Executing installation step 16 of 19: 'InitConfig'.

ASM has been created and started successfully.

[DBT-30001] Disk groups created successfully. Check /u01/app/grid/cfgtoollogs/asmca/asmca-241006AM085224.log for details.

2024/10/06 08:58:11 CLSRSC-482: Running command: '/u01/app/19/grid/bin/ocrconfig -upgrade grid oinstall'
CRS-4256: Updating the profile
Successful addition of voting disk 684858d2a57f4fe7bf33a33c6864fdda.
Successfully replaced voting disk group with +DATA.
CRS-4256: Updating the profile
CRS-4266: Voting file(s) successfully replaced
##  STATE    File Universal Id                File Name Disk group
--  -----    -----------------                --------- ---------
 1. ONLINE   684858d2a57f4fe7bf33a33c6864fdda (/dev/oracleasm/disks/DATA) [DATA]
Located 1 voting disk(s).
2024/10/06 08:59:42 CLSRSC-594: Executing installation step 17 of 19: 'StartCluster'.
2024/10/06 09:00:49 CLSRSC-343: Successfully started Oracle Clusterware stack
2024/10/06 09:00:49 CLSRSC-594: Executing installation step 18 of 19: 'ConfigNode'.
2024/10/06 09:05:07 CLSRSC-594: Executing installation step 19 of 19: 'PostConfig'.
2024/10/06 09:07:49 CLSRSC-325: Configure Oracle Grid Infrastructure for a Cluster ... succeeded
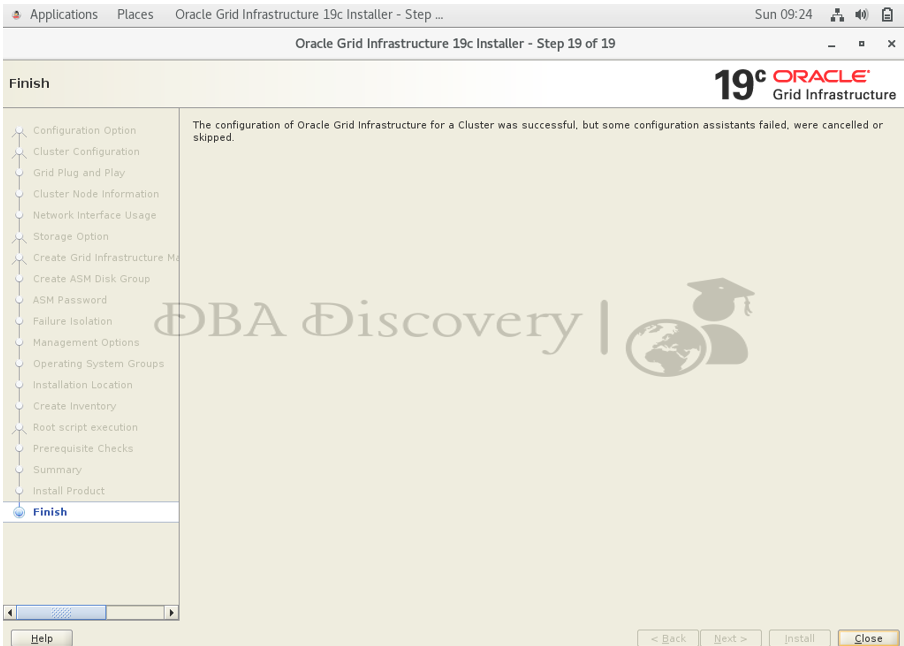
you may encounter a pop-up indicating that the Oracle Cluster Verification Utility (CVU) has failed due to issues related to DNS services. You can safely ignore this warning, click “Okay,” and then click “Next” to proceed with the installation successfully

Congratulations! The installation has been completed successfully.
Alert: The information provided on this website is for educational purposes only. It has been tested internally, but there is no guarantee it will work in every environment. It is strongly recommended to first test the process in a non-production environment, such as a User Acceptance Testing (UAT) setup. This allows you to verify configurations, identify any issues, and ensure a smooth transition to production, minimizing the risk of disruptions in your live environment. Always conduct thorough testing before applying changes to production systems.
I hope you found this blog helpful! We’d love to hear about your experiences or any questions you might have please share your thoughts in the comments. Your feedback is greatly appreciate